
so here we are I'm outdoors I've got
scaffolding going on next door I've got buses going past I've got my garage
which is not set up but I need a cutting board my wife just said these cutting
boards are split that we bought so we're going away from laminated we're going to
a solid cutting board and here we are outside and then I've got a black &
decker workmate here and I am going to make a cutting board for the house I
picked up a secondhand piece of wood here and I don't have all my tools I've
got enough to go with and I'm going to cut this off because I've got holes in
here and I don't want any holes in this there I am down to some crisp clean wood
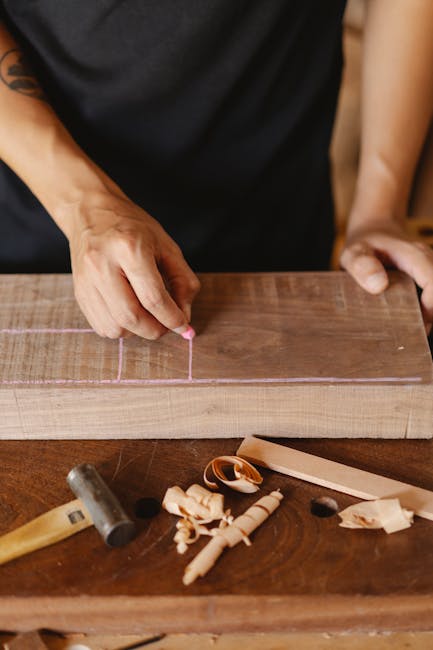
what about land this is going to be a just a general cutting board so first
of all I'm going to do in this is I'm going to find the center of this here so I've
got 6 and 3/4 so that's 3 and 3/8 there and you pull a line just roughly down
here there's my centerline can you see I've got some holes here I'm going to
avoid those that's going to be the length of my cutting board the main body
of my cutting board so a squared line across there like that and there's the
length of my handle what length is that just the width of my hand perfect this
is not.
So this is going to be cut here I think and then I want a neck on
the cutting on the handle here, about 5/8 either sides that's 1 and 1/4
across there so bring this shoulder up here and then you can go as wide or as
narrow as you want I'm going to go here and that's that so I'm going to cut this
out now with a coping saw see how far we get
I think I'll cut to length again first off oops too short this so that's
that I can get two boards out of this one probably the next bit I'm going to
be cutting this shape here there's a couple of ways we can do it
I'm going to work from this edge first I think
let's get your jaw line somewhere like parallel so you can get pressure along
the whole of these two faces tighten this one up and add a little pressure to
that one and let's see how this coping saw works I'm going to put my foot on
the lower level there work down these levels I've got mine on
the forward thrust this is cutting on the on the forward cut which means I've
got the teeth facing forward not towards me
and that's very important because you get much more power on the push cut than
you do on a pull cut so I've changed the angle of this because you see these little
pinions that stick out here these protruding cat there, leavers there
I've moved that so that I can rotate into the cut when I'm further in there
just hit the line that centerline see there so the reason I kept this piece in
one piece is because I want to flip it over line it up on the outside edge and
use that as a guide for my next cut from the opposite side now it could go from
the top let's give it a whirl from up here lower you're going the vise part
there obviously the less leverage against you see I'm holding this I've got two hands I put one hand
my dominant hand round and then I wrap the other one around it definitely
lifted up mainly knuckles on the vise I'm running out I'm run out of throat
there so I'm going to back out of my cut hopefully when I come if you get a
problem like I've got a problem backing out of my cut you can work this but one
thing you can also do is you can take a chisel like this and split it like that
and remove that middle piece if it will remove nope not going to remove is it or I can try
going further down in the cut and just cut above it like this now we can work
from the upper part again so I'm turning my blade you see I've got the levers
turned to give me an offset cut very effective really great for working with
younger people well that's my almost there cutting board got some damaged
edge here so I'm going to go in here do a little bit of planing which way will I
do that I've got to work towards a camera now I'm going to put rounded edges all
the way around mine so that means working with the the wood and just work
with it as best you can if you don't have a perfect bench and a perfect vise
you've got to work around that do some shaping on the handle first the main
body of the wood won't take much working with the plane but in here in the neck
I've got a rasp picked out here I've got a flat face in a round face take out
your marks and if you don't have a rasp just sand paper on a stick of wood will
work just fine I'm getting my shape it's coming just
fine these corners are going to be rounded so I'm not worried about the out cut at
this stage yes I'm not sure how much I want to do with the rasp really I could use the spokeshave a lot of this now you see this rough area
in here so this is a rasp not a file the file would have a hard time on this it
would work but take a long time you would be better with some paper glue to
a block of wood if you don't have that these harder corners here you can take
with the chisel and a hammer like this and then refine it so that's got the
shape I want and then take your rasp and follow that shape like this I want to
get rid of these hard corners here so again chisel and hammer so I start away
from the corner and then work into it like this and that is an easy way to get the corners down now
still got a couple of dings in this edge here that I want to get rid of I'm going
to use the plane for that and now I've got this this is all shaped in here so
I'm going to take down I'm going to take the corners off here so I'm using the
weight of my body now to make sure the bench isn't running all over the place
I'll take a 45 degree once you've got a flat face on here work on the hard
corners and bring it up around like this same on this side here hard corners it's
45 they show you that there's my hard corner there this is the rounded one now
I've got rounded so I've got the hard corner hard edge here hard edge here let
me take those off like this then I'm going to reset my
plane to a finer setting so just back off the iron bit more that's that one so
that's my hard Square as it was once like this like this one the end grain is
done the same way you see how coarse this is off the saw so we drop that in
the vise and the end will clean up just fine 45 take the corners off first
and so I'm resetting to a deeper cut so yeah I'm skewing my plane here so I'm 45
this way and I'm also 45 this way don't worry about the outer corner here
because this is going to disappear this is already damaged anyway this is a
piece of old poplar so I'm going to back the iron off again like this all the way out to the top
turn it around for my convenience actually you might decide to do the
endgrain first before you do your long-grain I just think that's probably
what I would do generally like this and then if you do break these outside edges
they come off when you do your long grain so it actually feels pretty good
that's a ball nose that's the way we would put the ball nose on the end of a
stair tread or a windowsill when I was a boy
so I reset that to a shallower cut haven't quite got the corner can you see how
this corner this is going to have to be done with the rasp here to follow that
radius around the corner and that's going to be much easier within the daily
use of the cutting board it's going to be much easier that's how we're going to
get that corner so I've just got this edge to do the handle to do set to a deep cut take up all the slack
and then 45 bit to heavy cut that I'm going against the grain too and I might
keep going against the grain anyway and turn it around in a minute a little bit
of vibration there turn it around so you're going with the grain just lighten
up your cut hard edges off all the way around onto the top on to the other side and there's your ball nose back off your
iron all around the corner and into that face so you could choose now you could
choose a rounded corner or you could choose a square corner usually wouldn't
have both in one tool in one piece like that so I'm going to take the corner off
and I could use a chisel or I could use the rasp and here if I use the rasp I
can keep going 45 degrees lift up and then feather into it like that and a single piece cutting
board like this will last a long time that's that so all I have left now is
the handle and this is going to be a combination probably of this spokeshave
and the rasp I thought I might use a chisel some but I don't think so maybe
for some other areas so I'm going 45 again like this like that get into the
corner as near as you can you can obviously go all the way even with a
round bottom spokeshave you wouldn't be able to go into this tight Cove in here
but you can get a lot of it see there forty-five bring it in as
near as you can take the corners off hard same this one here hard in keep working
that 45 degrees follow the radius with these short stabbing kind of pulls work
it around this is great for strengthening the our muscles the hand
muscles for developing the dexterity and I will show you what I've got here so
look I've got this rounding here actually feels pretty good I could
actually leave this without the rasp but I got to get in here yet I've done
around here a little bit too a bit more on this just
arrange it so it fits your body so you can get to it
45 and then around this end bit here's just a question of several pulls like
that successively and then work it round into that end grain this wood is working
quite nicely I pick your wood I'm going to go here because I'm going against the
grain the other way this is perfect if you're working with kids and you want to
teach them about grain a cutting board is a great place to start with them
using the spokeshave see I'm working on a pull stroke and then I'll flip and
I'll be working on a push stroke and this ties it all in with this kind of
triangular effort you got your two shoulder points going down to the hand
it's very important I can't get into that corner there's no way I can with
the spokeshave with that spokeshave I could with a round bottom so what am I
going to do let me see I'm going to try this put this one here this one in here turn
this here and with these you generally might find yourself having to sit on the
on the workmate to hold everything in place and even sitting on the workpiece
just to lock everything down this is only just wide enough here so I'm going
to see have to watch this area here because it can pull up see that it's
pulling up so you can shim it let's take a piece of wood if you need to just add
a shim in on some point here if you remember we split this didn't we like
that let's do that get it nice and tight at this end and then tighten this end up
as well that'll put a little leverage on it let's see if we can get it now yeah
we can so you can get these internal corners very nicely here so again we're
switching between the spokeshave and the wrasse the whole time follow
that radius this corner can go like this now we did the other one with the
spokeshave now we're using the rasp you could use the sand paper on the paddle so nothing stops us from woodworking let's get the inside corner we get in
there pretty close this one is a little awkward cuz rasps are left and
right-handed if their hands States rasp so it's less effective when it's used in
the left hand like I'm using it it'll still work and that's the basic shaping
of this done and you go with the spokeshave I think here I could go with
the rasp it's up to me you can see I've got a little bit of blood there
want to get that off so I'm going to use this spokeshave here pull I don't think
you can see there I'm going against the grain there's it's tearing but I still
work with it for a little while and then turn around just to straighten
up I must say the spokeshave gives me a
better cut than I can get from the rasp so you get a cleaner crisper cut but
there's just some points where the spokeshave will not go so I've got one
other tool I want to just introduce briefly I think and that is in a minute
I'm going to introduce the scraper I just have a single flat plate of Steel
that we can use as a scraper to refine some of the cuts just before we go to
the sandpaper and that's this one just a thin place of steel sharpened in a
special way but this will take off shavings on here and you can flex this
too like this so you can flex it a little bit and get some rounding in
there if you need to that's nearly my cutting board done so this is just a
sand paper 150 grit is usually enough and the reason I say that is because when you've finished this cutting board you're going to dull it it
you're going to wet it you're going to put it in a bowl of water just for a few
minutes let the grain rise and then leave it to dry or take a hairdryer to
it and dry it and that will raise the grain probably for the last time then
you sand it one more time and it's ready for you you don't have to add anything
to it you don't have to oil it unless you want to for appearances sake but you
never have to do anything to it again and because you don't really need to
rejuvenate the wood or anything like that it it doesn't need anything because
the wood in itself is a great finish in and of its own so that is all I need
to do now is sand this if I want to and it doesn't have to be sanded can't
believe we're filming today it's got so much wind but like I said at the
beginning we're amateur woodworkers nothing stops us it's a great way wind
weather scaffolders and busses nothing stops us from enjoying this thing called
working with wood here I've got two pieces of sandpaper wrapped together
there's some paper lasts about twice as long if you do that and it cushions
those round overs I am nearly there nearly close enough to show you what
we've got work it around I've worked so many times from one of
these black and deckers over the years and actually saw of my children and now
my children's children are doing the same somewhere in the world there's
nothing to it is there this is real woodworking this is you working the wood
being creative training your hands training your eyes your mind everything
is synchronized into a single cutting board does that work for you because it
does for me take off the rough bits take it in the house stick it in a bowl of
warm water for two or three minutes let the grain rise and then let the wood
have its way for the very last time from after this time it's going to be
subjected to chopping and making food palatable there you go cutting board done new
enough and I think you'll enjoy this I think it's a great project to work on
and if you see this as if this is your first time to make anything from wood
this will be the very first of many times you'll be out there in the cold in
the wind and you'll enjoy it just as much as I have