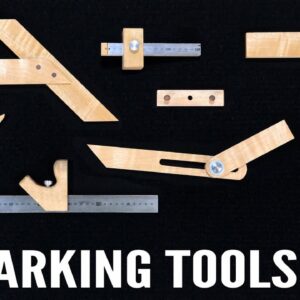
scrapwood challenge scrapwood challenge it's scrap it's crap it's firewood but some of the wood is good I prepared all the wood first for all
the tools so now it's time to get on with the first one I've tried to make the tools as simple
as possible to make and this squares about as easy as it gets it's just four
pieces of stock all the same thickness that's about six millimeters
first of all I'll glue their handle together or the stock with these three
pieces that leaves an open mortise and when that dried we'll glue the blade in
then we could have started off with a piece of stock this wide and just cut
the mortise out but I think this way is nice and simple and you get a good
accurate mortise to keep them lined up I'm using a couple of pieces of scraps with packing tape and then clamped to the sides now we need to make sure that both
edges of the stock and the blade are flat and parallel to each other you could do that with a hand plane but this particular wood that I've picked out
would chip very easy so I've glued a piece of sandpaper to a flat piece of
stone while the glue is still wet we'll test
whether its square so I'm gonna put it against my bench here make a line down
this one side flip it over and if that lines up and then we're all square and
that does and if it wasn't and we can undo the clamp and move it slightly to
where we need it clamp it back up and test again and you do need to test the
inside of the blade as well but if it's parallel that should all be good too
which it is although it's not necessary I'm going to put a couple of dowels through the joint I think the glue on its own will be
perfectly fine if it is but the dowels will look quite nice I've got a couple of scraps of silky oak
and I've just made my own dowels with that because the try square was so easy to
make and I had spare stock I decided to make a 45-degree one as well and it was
exactly the same I just have to cut the ends of the stock at 45 degrees to check
the accuracy of the 45-degree square I'm going to use the corner of my workbench
I'm using this corner because I know it's square not all the corners of my workbench are square but I know this one is so if I make a line across like that
and then check it against the opposite edge and as you can see that's pretty
accurate every now and then just test that it's
still square it probably will be but it's easy enough just to draw that line
flip it over and check it and if you need to make any adjustments to the
blade then just use sandpaper or a plane to take off what you need to get
it back square it's that easy the bevel gauge is very simple to make too I've got two pieces here they're almost ten millimeters thick and they make
either side of the handle then I've got a small piece here the same thickness of
the blade and that's about six mil thick so we'll glue these together first and
that will make up the handle and then the blade will be able to slide in that
slot there while the glue is drying on the handle
I'll start working on the blade this could because out with a jigsaw a
scroll saw or even on the router table I have all those things but I decided to
do it with the coping saw to hold the blade in I'm going to use an
m10 bolt so the one side I've drilled 11 millimeters so the bolt passes through
and then the other side I've drilled at 8 and a half millimeters so I can tap
that two 10 millimeter before I move on to the next tool I just
like to thank today's sponsor which is audible I've been using their service
for years and if you ever see me in the workshop with my headphones on I'm
listening to an audiobook from audible my personal recommendation is The man who made things out of trees it has similarities to the scrapwood challenge where the author makes as many things as you can not out
of scrap pile but out of one single ash tree it's a great read and I definitely
recommend it audible has the largest selection of audiobooks on the planet and now audible members get more than ever before each month audible members
get three titles of the choice an audiobook 2 audible originals exclusive
sales and 30% of all regular priced audiobooks there's never been a better time
to experience audible try it free for 30 days by visiting audible.com/paskmakes or by texting paskmakes to 500 500 and thanks again to audible for supporting my channel I made this marking gauge a while back I'm going to make another it's going to be more simple
I like the ruler on this one so I'm going to do the same thing and instead
of making a cutter I'm going to use nails instead and the reason I have two nails
is it's going to be a mortise gauge for setting out mortises but if you prefer to
just to make a marking gauge with one pin and that's easy enough to do too the head could be made out of one piece but I reckon this way is a little bit easier the two holes are for the pins and I
needed them as close to the edge as possible if I'd have tried to drill that,
that close to the edge it would have just broken up so I drilled it further
back and then sanded up to it so now I'll go to glue this little block on the end here I'm using acetone to clean the ruler and the beam first before I stick them together with epoxy I've just filed a notch in the end of the ruler that allows me to line up the end of the ruler with the hole for the pin and it
still gives enough room for the pin to go in the hole the holes for the pins are drilled for a
tight fit and to prevent the ruler from getting scratched or damaged I'm putting
a small piece of dowel into the threaded hole before I put in the homemade thumb
screw the center finder could be made to any
size I'm going to make it quite small as I'll be using it just for tool handles
or stool legs and things like that the next three tools are all very simple
but make sure you stick around to the end because I've saved the best one for
last next we'll glue on the centerpiece but
before we do that we just need to make sure it's a hundred percent square and
if it isn't make any adjustments I cut this strip at half the width of this top
piece so if I line it up along this outside piece there then it should be in
the center and I'll just check for the 45 and it needs twisting around a touch I kept it small so it fits in the hand
nicely it's a very simple tool it's very useful and I can't believe I've never
made one before the ruler should go in the same way so
the magnets rub on the back of the ruler and they don't mark the front even though it's easy enough to move the stop it stays in position well enough when you need it to there's not much to the center line finder all you need is a scrap drill three holes all in line and evenly apart the middle one is 7mm for a pencil and the outside ones to match the dowels in my case that's 8mm I probably should have made the dowels just a touch
longer but it still works I've kept my favorite one to last it's a
combination square and I'll start with the blade the body's made up of three pieces
they'll get laminated together the middle piece is slightly thicker than
the blade and then the last piece will get glued on like so and that will hold
the blade in place and then what I'll do is shape the body to resemble a
combination square like this or something like it it'll have a screw the
same that will screw down onto the ruler but we don't want the screw to hit the
ruler so what I'm going to do is I'm going to cut a small section out around about there and then we'll put a piece of loose floating hardwood in there and
the screw can push that against the ruler when I drilled the hole for the
thumbscrew I realized that the drill wandered off but I didn't realize that
it went in on quite an angle I don't know if you can see that I'm gonna try
and fix it the reason it's done that is because
that middle layer I've alternated the grain in the opposite way and I was drilling
into the end grain and the drill bits wandered off to find an easier path so I'm going to chop that out glue a block in and then tomorrow I'll have another go at it this time I did it on the drillpress and I used the Brad point bit I should have done that in the first place the wooden threads will be absolutely
fine and won't wear out any time soon the thumb screws are only hand tightened
and being an m10 bolt helps too I never expected that to be square and
it isn't that's quite a long way out I just have to sand a little bit off this
edge here it took quite a few goes to get it just right but now the square and
the 45 are both perfect some of those tools I didn't think
warranted their own video that's why I made this one hopefully you enjoyed it
if you did please like and subscribe thanks for watching and I'll see you on
the next one