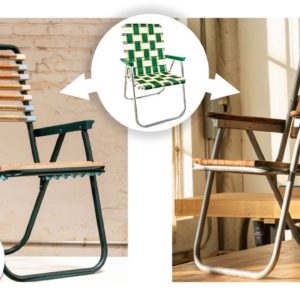
uh [Music] i'm alex sue i'm a furniture designer and artist and i would describe my style as thoughtful playful and craft focused my name is lauren verdugo i'm an artist and furniture maker i would describe my style as sculptural functional and sustainable what did you think when you found out you'd be transforming a folding launcher uh it's already a perfectly comfortable chair so i want the function to still be there it's called a folding chair so let's hope it still folds it's going to be tough to hack a chair in eight hours chairs are notoriously difficult because they take ergonomics into account and even more difficult if they have mechanisms that move just to qualify it fine woodworking doesn't happen in one day normally so this is going to be a challenge time is of the essence so i'm ready to get started let's get to it my design process is quite meticulous i like to have everything sort of figured out before i even start to dig into my material i like to make all my mistakes on paper first because the second you start cutting up some wood the second your mistakes become way bigger or way more expensive seeing as the chair is quite cold and industrial i was hoping to introduce wood and cork which could potentially interfere with the folding mechanism when you're working with wood you're typically not working with a blank canvas the grain is going to have some sort of swirling it's going to have some cathedraling in it a lot of those beautiful elements you'll want to bring out in the chair so that definitely dictates the design so the first thing i'm going to do is i'm going to take the existing frame i'm going to remove all the webbing and i'm going to see what we're working with [Music] for the frame i'm going to make sure that i clean it off get the aluminum all nice and shiny aluminum is a pretty slick material and paint doesn't adhere to it so well so scuff sanding it beforehand gives it a little more grip for the paint to adhere to and then once i do that i'm able to prime it [Music] from there i'm gonna source some lumber at the lumber yard typically i'll go to street tree revival in anaheim they deal with what's called urban lumber so they're saving trees that are close to a water line they're already dead they might fall on something they're a fire hazard anything like that and they'll take them and instead of putting them in the chipper they will put them into kilns and turn them into raw lumber so we made it to the lumber yard and we're gonna pick through this pile to see if we can find any winners and these two are what i pull beautiful straight grain i think these are gonna do just great this grain on this wood is gonna be kind of hypnotic having a lot of chatoyance which chatoyance is just that ripple kind of looks like it's flowing through the wood holy chatoyance that's what i said when i saw the wood i was like holy chatoyans so the next steps would be to true up all four sides and make them all square when you get wood from a lumber yard it usually comes partially milled so it's quite rough to the touch and it needs to be machined in order to have that nice smooth surface this is the jointer and this is going to make this nice and flat basically you're making reference surfaces so everything's repeatable and accurate [Music] being square and woodworking is actually a good thing if you end up having a slight angle you'll have a gap in one of your joints and that will definitely show that you weren't paying attention right from the beginning it used to be like that now it's flat then i'll head over to the planer and the planer uses the flat surface that we created on the jointer as a reference surface to then create a smooth surface on the top of the wood [Music] so basically this is the process that you start pretty much every project with starting with rough and getting to smooth plain lumber the arms of the original chair are a little funky definitely will not match the wood the way i want it to the chair arms are actually riveted on so i can't technically take them off and i realized that trying to replicate those parts would take most of the day so we're just going to add a piece of wood on top and mount it that way i took this template and made it out of my drawing so i'm going to put this on here trace it and cut it out [Music] okay so now that we have two identical arms i'll go ahead and make those arms into what will be the new armrest [Music] [Laughter] that's pretty far along so this is starting to look good as soon as you put your arms on there it'll have a nice place for your arms to travel down i'm gonna flip this over i end up using rasps and files that way i'm shaving off pieces of material and it's turning into more of a sculptural bow it helps keep the flow i'm being very careful here because i can't take off too much or else it will not match the other arm if i mess up then i'm going to have to make the mistake on both arms for this project i really wanted to introduce a pop of color and i thought the best way to do that would be introducing some laminate so this is my humble collection of laminate samples most people use it for testing a color swatch for let's say like a kitchen table or something but i thought it'd be a good idea to repurpose these and incorporate them in the slat for the final chair it's kind of a game of swapping them in and out and figuring out which looks the best put a little too much pressure on the end and cracked it so if you do use laminate beware it can be a little brittle i'm going to trim off the edge here and i'm actually going to cut it to the final slat size so this is the seat that i have here i'm going to cut a really nice little half circle into this part here that way it'll look really nice on that rounded frame i'm gonna take the board over to the router table to create a groove in the bottom of the slats so that they eventually nest nicer onto the tubing of the frame i'm gonna go up about a quarter of an inch yeah all right [Music] [Applause] [Music] all right that looks pretty good look at that looks great good cut i want this chair to be custom so it's going to definitely need to be carved if it's supposed to be comfortable so i'm going to go ahead and scoop the butt pattern that i'm going to put on the seat out after i've created that groove on the underside of the planks i'm going to take it over to the table saw to cut the wood into individual slots the table saw makes my life a lot easier because it allows for me to make repeatable cuts of equal thickness i want to add cork to the top of each slat so i'm going to take the slats back over to the router table and route out a groove for them to sit in [Music] the router table is a super powerful tool and it comes with a lot of bits that you can use that can allow you to achieve certain profiles so in this case i'm using a straight router bit to cut this groove that the cork will fit in cork is an amazing material it's made from the bark of a cork tree and it's infinitely renewable harvesting it doesn't harm the tree at all so it's still a little rough but we're gonna sneak up on its final thickness on the belt sander so the next step would be sanding and more sanding [Music] and more sanding after that [Music] so i'm looking to remove any lines that aren't obviously the grain so i'm looking for saw marks or scratches in the wood that are a little bit deeper than the surface i'm going to take this off and put on the 180 grit sandpaper i'll go from a lower grit which is more coarse like 80 and then i'll work my way up to the higher grits which i will end up ending at 180.
i feel like every woodworker at the very beginning says that sanding's therapeutic which it is but it's always hard when you're on a deadline [Music] now that this is cut to size we're going to take this piece of cork to the router table so we can get it to fit inside this groove so in this case i'm using a round over bit to create a speed bump like profile for each slot then i'm going to take it over to the table saw to cut off the little strips that i need you got a little cork speed bumps back to the router table it's really just about repeating that process back and forth hopping from the table saw to the router table [Music] let's see they kind of just pop on in cool there we have it the glove fits now so the best part of any project is finishing but more importantly seeing that gorgeous wood totally pop every time you put that oil on it just starts singing oh my gosh that's a treat and a half wow look at the comparison there that's insane [Music] so the last step the one that we've all been waiting for is assembly we got these oiled pieces and the finished frame so let's see it all together [Music] [Music] so once the flats are all done now it's off to final assembly [Music] [Music] hello hey alex hey lauren i'm so stoked to see what you made all right see i i knew you were up to something that is so hard wow and your piece the way that you've sort of accentuated the figuring of the wood and augmenting the armrests that was a challenge that i kind of wanted to stay away from but i'm glad you did something to them what type of tree is that this was a street tree oh great it's indian rosewood so it's at least like weatherproof it's like teak i love that side view too of the little notch that you made for that axle and then seeing kind of that rough edge of the wood itself that's really nice detail i like how you kept with that green i really liked that green except you made it a much better green i think so the fasteners on the back the little blue guys what are those i love those i think they're called saddle washers it's an a little bit nicer attachment method kind of reminds me like like vertebrae or spinal aesthetic man that cork came out really nice nice i didn't know you could do that with cork that's really cool like didn't crumble and stuff pretty amazing yeah the binding agent is strong enough you basically can work it just like wood except it doesn't you know really expand or contract and environmentally friendly is it comfy it's relatively comfy you might look like you've been grilled if you take the speech uh take this chair to the beach you know like a couple of ribs but really softly like a very soft grill yeah yeah yeah trying to make a chair in general is incredibly challenging and then trying to make a comfortable chair is even harder um yeah so i was leaving the ergonomics kind of up to the the original designer does yours fold by chance mine does fold most of the way i would say like ninety percent of the way i was like not expecting it to fold right and then i was like click and i'm like oh check it out so that was a nice thing yeah i would be happy to walk home with like either one of these chairs i wouldn't be mad absolutely big big hat tip to you thank you thank you one hat to another lauren it was lovely to meet you and see your chair you've done an amazing job i would love to link up since we're both in la check out each other's shops and swap a lot of stories yeah i'm down i might even have to make some sawdust who knows looking forward to it you