In this tutorial, I’m going to
go over some of the basics
of using Sketchup Pro 2020 as a
woodworking design software.
These basic design concepts will
work in any version of Sketchup,
even though I’m using Sketchup Pro 2020.
First I’ll start up the program.
I’ll select the template, “woodworking inches.”
One option to start to your design process is to measure
the area where you want to put that furniture.
For instance, if I’m designing something
like a bookcase or a dresser,
I’ll measure the space in my
house where I want to put it,
and that will give me my basic
dimensions for the furniture.
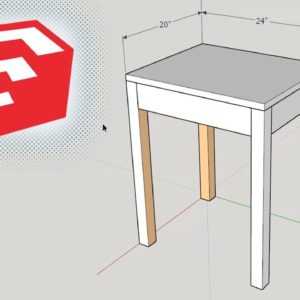
Let’s say I’m designing a table, and based
on the space that I want it to fit,
I want it to be 24-inches wide, 2-inches deep, and 30-inches tall.
So, first I’ll make an area in Sketchup that is that size.
I’ll switch to my tape measure tool,
click the red axis and move
upward along the blue axis.
And type in 30, which is
the height of my object.
Then I can zoom in a little bit.
I know I want it to be 24-inches wide,
so I’ll click the existing guide,
and move along the green axis.
And then type "24" + enter.
To make the back of the object,
I’ll click the green axis and go upward
until I collide with the other guide,
which is 30 inches.
I can also type in “30” and hit enter.
And I want the depth of the
table to be 20 inches,
So, I’ll click this back guide, and
then move along the red axis,
and type “20” and hit enter.
Now I have a basic shape for the top of my table,
So, I’ll switch to the rectangle tool
and click on one of these intersections.
And then click on the opposite intersection,
and I have a tabletop with no thickness.
Now its time to make another design decision about the thickness of the tabletop.
This could be based off of the style that you want,
or based off of your materials available.
If you have one-inch lumber available,
make it one-inch thick or seven-eighths of an inch,
so you can plane it down to your size.
I’ll make this tabletop one-inch
thick based on the availability
of one-inch-thick pieces of plywood.
So I’ll switch to the Select tool,
select the fill of my rectangle,
and then switch to the Push/Pull tool.
Then I’ll click the corner of the tabletop,
and move it downward, and type “1” + enter.
That’ll make the tabletop one-inch thick.
Then, I’ll triple click on the tabletop,
right click and make it a
component and name it tabletop.
By making it a component, I won't interfere
with it when I draw my other shapes.
Now that I have the tabletop modeled,
I’ll make some legs under it.
I’ll zoom in, rotate my camera
to below the tabletop,
And, at this point, I don't need
those guides that I’ve made,
so I can go to Edit, Delete Guides,
and keep this file nice and clean.
This is an opportunity to make another design
decision about your piece of furniture.
there are a few ways to determine where you
want to put the legs on a table like this.
One of them is study the style of the
furniture your trying to emulate,
or measure a piece of furniture you like,
and see how far in the legs are set.
Another option is just trial and error
in Sketchup to see what it looks like.
I’ll switch to the Tape Measure tool,
click on one of the edges on the bottom,
and then bring it inward by 2 inches,
because I want the legs to be 2-inches thick.
hit “2” + enter.
And on the adjacent side,
I’ll do the same thing.
I’ll click on the side and move
inward, and type “2” + enter.
Now I have a little square that I
can trace with my rectangle tool.
I’ll switch to the Rectangle tool,
click on that intersection,
and then click on the corner.
Then I can switch to the Selection tool,
select that square, then I
can use the Push/Pull tool
to extrude this leg all the
way down to the baseline.
So, I’ll click the corner here,
and then move downward.
I’m zooming out and moving the camera,
so that I can see where I’m going.
So, I’ll drag it down, and I want it to
snap to this red line right there,
which is doesn't seem to be,
but if I move my cursor over to the origin, it will snap to that.
So, I’ll click on the origin, and my leg will be all the way down to the baseline.
I’ll triple click on that leg, right click, make it a component,
and call it table leg.
For this table leg, I really need to
know which sides are on the inside
if I add joinery or something later.
So, I’ll edit this component and make two of the sides a different color.
I’ll double click on the component, then I can rotate it.
And I’ll go to my materials panel, and I’ll choose this orange color here,
and fill in the two inner faces.
Then I’ll click outside of this bounding
box, indicated by the dotted line,
and that will take me out of the component.
I’ll zoom out and now I can start duplicating it.
I’ll use the Select tool to select the leg,
and then switch to the Move tool,
hold down “Control,” and click the corner.
This will duplicate it and I’ll
drag it along the red axis.
Now what I need to do is rotate
this so that the orange face
is facing inside the table on all the sides.
So, what I can do is zoom out to the bottom,
which will be the easiest place to rotate from,