– [Shane] People love
having stuff made for them. Whether it's breakfast or
some kitchen tools to help. So today, let's focus on the latter and make some gifts that
are sure to be a hit on "Timber Biscuit." All right, so about a year ago, I made a video about simple
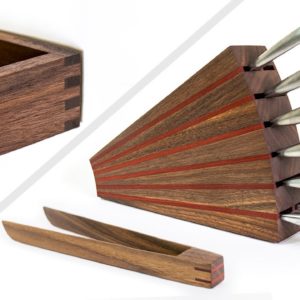
woodworking projects for gifts. And this is our part two. So we'll kick it off with a knife block you saw
on the opening sequence. And for these gifts, I'm gonna be using walnut
and bloodwood as an accent. They're two of my wife's favorite stocks. And since these gifts are for her, I figure I'd better stick
with what she likes. Plus you can never go
wrong with using walnut. So once I had my stocks milled flat I took the bloodwood over
to the bandsaw to resaw it.
Now, this stock is incredibly dense, so I didn't wanna have
to take a bunch of passes at the planer to get it
to the final thickness. Plus, because I'm resawing, it'll give me two panels to
work with for my divider strips. So once I have my pieces
to their final thickness, I took them over to the table saw to cut them to their final length. And it's important to note here that I'm leaving the
divider sock a little long so that I can flush trim it once everything's glued up later on. So with my ripping blade installed, I could go ahead and start
ripping out those divider strips. And these will just be thin strips that'll sit on either
side of the knife blade to hold the knife in place. Plus, they have the added benefit of giving some contrast of the piece, which in the end will look really cool. All right, so with all my strips cut out, I could trim out my larger pieces into four blanks over at the bandsaw.
And I'm using my bandsaw
here rather than my table saw only to conserve some material. The overall dimensions I need are just over three inches wide and my boards are about
six and a quarter inches. So I had to conserve as much as I could. So once I had my four blanks cut out, I could go ahead and lock down the fence, and cut out a sled. This will be the sled
I use to cut the tapers to give us that flared look. So once I had my angle
set with my bevel square, I mark that out on the sled and then mark the start
and stop point for my cut. From there, I could just attach an off cut to act as a fence for my tapers. Now, it's important to use
some thicker stock here to make sure that it can support the piece while it's being cut.
If not, you risk the piece
moving while you're cutting and then at the end, things won't line up. Kinda like pineapple on pizza. But hey, no judgment here. All right, so once I attach the rear stop all I need to do is
attach a hold down clamp and we're good to go. So next I can take the whole sled back over the bandsaw and cut out my tapers. Here, I was just really careful to make sure that I had enough room for my hold down clamp to clear the blade. And I also took an added piece of MDF to the opposite side to make sure that the
work piece stayed flat throughout the cut. Once I had one taper cut, I just rotated the blank and cut the second taper out of the block.
This gives me two tapers per blank which is perfect 'cause
for this knife block, I need seven. And we'll hold onto that eighth one for one of the projects we
have later on in the video. And if you don't have a bandsaw, you could cut these over at the table saw. It would just require two passes
over the blade for each cut because your table saw blade
height won't cut all the way through the block. So it's just a little trickier. So those cuts done, it was time to give
everything a quick sanding. And because sanding is not the most exciting
thing in the world, we'll go ahead and speed through that. All right, so now that we
have all our pieces sanded, we can go ahead and start assembling. So the first thing I wanted to do was mark out my orientation. And here, I'm keeping that 90 degree angle on the bottom of all of them
to keep a nice consistent look. Once I had all my wedges numbered, I started laying in the dividers.
Now for the dividers, you're really gonna have to think about the knives that you have, or the knives that the person
you're making it for has, or to shoot for your more standard sizes. I divided the bottom row
into two different sections so that it could hold two smaller knives. The four areas above will only
get dividers on either side, so they can hold much wider blades. The top section does
have a bit of an offset to fit one medium-sized
knife and one small knife. And don't worry about the
knives rattling around. We'll address that in a second. And I do this in sections while using a combination
of wood glue and CA glue, so that the pieces stay in
place while the wood glue dries.
Oh, before I forget, if you want the plans for this project or any of the other
projects in this video, be sure to check out the description. All right, so back to the build. So if you remember earlier, I said I left those dividers long and that was so that I
could flush trim them just like this once
they were all in place. Since pieces can move during glue ups, it's definitely a good
idea to give yourself a little bit of wiggle room and leaving these long does just that. And speaking of wiggle room, next, it was time to
address those wiggly knives. And my solution for that is just to glue in a
small rare earth magnet. This should sit below the surface so that doesn't scratch up the knives but it'll give a nice hold to the knives to make sure they don't jiggle
around in the knife block. While most knife blocks just use gravity to hold
the knives in place, the design of this block allows some of the knives to sit flat.
So we wanna make sure
that those guys stay put. And since this magnet sits deep enough that it'll just hit the blade, it'll counterbalance the
weight of the handle, stopping the blade from tipping. Because there's nothing worse than thinking you've
secured a sharp object only to have a jump back at
of you and cut your hand. Not that that's ever happened. All right, so now that
the magnets were in place, I could start attaching
the sections together. This time, however, I only needed to use wood glue and to clamp everything together, I used two offcuts to offset
the angle on my taper. This way I could get
good clamping pressure. And then just repeated this process until I had all my sections together.
This process did take a little patience, but honestly, woodworking minus
patience equals firewood. So I just took my time to get things to line up as best I could. Once I divided and conquered that, it was time to clamp up
everything into one large sandwich and let it dry. From there, I could just use my random orbit sander to clean up into the offsets that were created during the glue ups. Now, to get a nice curved
edge on the knife entryway, I just use my random orbit sander and smooth out a subtle curve. This is more feel than
an exact measurement. I just wanna make sure that
things look nice and smooth. As for the other end, I just use my spindle sander
to give it a matching radius. If you don't have a spindle sander, you could use wooden dowel
wrapped in some sandpaper to get the same effect.
And if you've enjoyed this video so far, be sure to give it a like so
it can spread to more people. Thanks for your support. All right, so with that
one just about wrapped up, let's move on to the towel rack. And my first step here
was to mill my pieces down to their final thickness. Now, I'm gonna leave these a little wider than they actually need
to be for my final piece so that I can trim it back
as a full box later on.
But I'll talk more about
that when we get there. Next, I needed to cut two square edges onto the end of my sticks. This way, I have a square edge to reference against for
my horizontal pieces. And to cut those out, I'll just set a stop on my miter gauge. From there, I could use my crosscut sled to cut out the sides and center divider. I prefer using a crosscut sled over a miter gauge for
small cuts like this. This way, I can avoid my
fingers being near the blade. It's also not a bad idea
to use a whole down clamp so that you can ensure that your work piece stays in place and doesn't shift while making the cut.
The joinery for this towel rack is gonna be finger joints and that's because they're gonna add a little bit of visual interest as well as structural integrity to the downward force that
a towel rack will see. So I've made it short on how
to build a finger joint jig but just in case you missed it, here's a quick recap. The most important part
of any finger joint jig is to dial in your spacing. You wanna make sure that
the width of your dado stock is the exact width of the
pin on your finger joint jig. Here, I'll be going with a quarter inch. But if you wanna use
wider or thinner pins, just adjust your dado stock
and your pin accordingly. All right, so now that
we're all caught up, what I'm doing here is setting the width that I just spoke about.
Now, this does take a
little trial and error, so make sure that you have a
few off cuts to test your fit. If it's too tight, move
the pin closer to the blade and if it's too loose,
move it further away. But once you do have it dialed in, it's pretty simple. To start the cut on the joint, we wanna use that pin as a stop and then make our first
pass over the blade. From there, we just lift the piece putting
the pin into the notch, and then make the next cut. And we repeat this process
until we can't go any further. Oh, and if you're not using a dado stock, just make sure to do this
with a flat bottom blade. To cut the adjoining side, we just rotate our first
work piece 180 degrees and drop it onto the pin. This will create a gap in that first notch of our side piece.

And then we just basically
repeat the same process again. (bell dings) Once we've cut all of our
notches into that side, we can flip the piece 180
degrees and repeat our process. When cutting box joints, I like to cut my front first, then my two sides, and then the back. This way I have a better visual of which side I want
to face out on the back and which side I want to face in. Just remember that the
front and back pieces should have matching notches, and that your two sides will
have matching notches as well. All right, so the last piece to align before we do the glue up
is the center divider. And do that, I just use a ruler to mark the center, and we'll just clamp this guy in place. There's really no need for
any added joinery here. So again, we'll just keep things simple. Kind of like Forest Gump's password. You know, 1forest1.
All right, so while this
towel rack hangs out to dry, let's get started on the tongs. So to get started, I ripped down two strips so that I could create my tong squeezers, or grabbers, or whatever you call 'em. So inside my two strips cut out, I ran 'em through the planer to thickness 'em down to 3/16 of an inch. That should give them enough rigidity for a good size tong, but if you go with a super long set, they may weaken a bit. So once I add them to
their final thickness, I taped my two pieces together to ensure that they were the same length and this will also help with the end profile that
we'll do in a minute.
Once I set my bandsaw fence
to the width of my tongs, I went ahead and cut down that extra wedge that we had from the knife block. We'll now use this piece to
create the wedge for our tongs. So as you'll recall, the bottom of this wedge is 90 degrees, and we don't want that. So, I use an off cut to create the mirrored
edge we're looking for, and then cut it out over the bandsaw.
Now, when cutting your wedges, I think it's an opportunity
to have a little fun. You could go with some longer wedges, or some thinner wedges, or even some steeper angles. It's really up to you. Since my vision for these tongs is more of like a salad serving set, I'm gonna go ahead and round over just
one corner of the ends. But you could opt round over both ends, or not round over any at all. Again, do whatever you like. All right, so once I finished rounding over the tips at the disc sander, I went ahead and sanded the
remaining pieces up to 220. Then it was time for some glue. and I really like a set of
wooden clamps for this operation because they can be angled and they don't slip off as easily. But to stop the wedge from
shooting down the handle, I went ahead and clamped
in a piece of MDF. Without this piece in place, the wedge would definitely slip out. So, once my glued set up, I cut in some slots for some keys. Now, these are completely optional but I have that bloodwood sitting around so I figured I may as well use it.
And while they're not adding
any structure to the tongs, I think they add some visual interest and makes 'em look a little cooler. So, I just clamp the tongs
to one of my off cuts and run it vertically over the blade. And once my keys are thickness
down to the correct size, I just glue them in place. And we're looking for a
somewhat snug fit here, but not so tight that the need to be tapped
in with a mallet or anything. So once the glue was dry, I could cut the excess off
the keys of the bandsaw. Now again, here you could
use a flush trim saw if you don't have a bandsaw. Just make sure that you
cut in towards the tongs not out and away from them so you don't tear out the keys. From there just use my
random orbit sander clamped in a vise to sand everything flush. Now, I have a few strips left over. So I'm gonna make a few toaster tongs with my remaining pieces.
And these tongs are super fast to make. So get ready. So first, we're gonna trim out our blocks to about an inch and a
quarter by say seven inches. Then, we're gonna use
a one inch forstner bit to drill a hole through the center. This hole should be placed
about an inch from the top edge, otherwise, it'll snap and we
don't want that to happen. So once we've got our whole
punch through the center of the top of our tongs, we're gonna take the
piece over to the bandsaw and remove the waist from the middle. Now, my fence has just set
at a quarter inch here, and I'm just making one
straight cut through each side, and when we're done, we'll have a pair of tongs. Now, as an added option, you could add a small magnet
to the back of these tongs so they could stick to the toaster.
I didn't do that here
'cause I out of magnets. All right, so now that our box joints have had plenty of time to set up, I'm gonna go ahead and
remove that excess waste. And I start by using a random orbit sander just to knock down the really high edges. Then I come back with a hand plane to really flatten out those joints. So earlier in the video, I mentioned that I left
these pieces a little wide and that was so that I
could flush trim them here at the table saw once the
box was all assembled.
This squares everything up, plus I get to remove that extra pin. And I think the final piece
looks a lot nicer that way. And hey, if you enjoy these videos, and you wanna support the channel, I'd like to invite you to join my Patreon. Where you'll get discount
codes on plans and merch, and invite to the Discord server
and some other free stuff. And I'm always looking for new ways to get you guys involved
with the projects I'm doing. So be sure to check it out. The link will be in the description. And for those of you
who've already joined, as always, thank you so much for your support. The final step for these
pieces was the finish.
And for that, I'm gonna
use some butcher block oil on the pieces that are
gonna come in contact with food and food utensils. And for the towel rack, I'll just use a penetrating oil. If you're looking for links to the items and products
I've used in this video, I'll have them linked
down to the description. Now, full disclosure, I do get a few pennies if you do buy, but I would never recommend
anything I don't use myself.
So once the two coats are finished, we're drying on all my pieces, I went ahead and applied some rubber feet to the bottom of the butcher block. Then I attached some heavy duty hooks to the back of the towel rack. Now, these hooks are the same
ones I used on the coat rack a few years ago, so I know they're quality and
they're not gonna tear out. And once those hooks were in place, these guys were ready for a bow. (chill music) I'm really happy with how these simple
woodworking gifts came together. This wasn't an overbearing
build by any means, and it was a lot of fun to make these small projects for my wife who I know is gonna love 'em.
So if you're looking for a simple gift for a friend, or a loved one, definitely consider
making them one of these. Or better yet, make all of them. Or if you're looking
to earn a little money, these things will do great at craft shows. Either way, create what you
like and have fun doing so. And in the meantime, if you wanna see more
videos like this one, be sure to subscribe. I'll see you next time.
(chill music).