Introduction
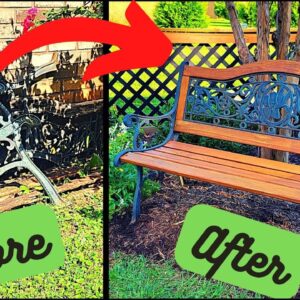
Outdoor furniture adds significant value to any outdoor space. However, over time, these pieces may require some work to restore them to their original beauty. In this article, we will discuss how to restore an old garden bench. Dee, from D’s yard, shares her journey of restoring a beautiful cast iron garden bench with new wood.
Step 1: Assessing the Damage
Before starting the restoration process, the first step is to assess the extent of damage. Dee’s garden bench had broken and rotting wood, which was beyond repair. Therefore, she decided to replace all the wood slats. If the damage on your garden bench is severe, it’s advisable to replace the damaged parts rather than repairing them.
Selecting the Right Wood for Replacement
When selecting the wood type to replace the damaged pieces, you must choose wood that is ideal for outdoor environments. Pressure-treated decking boards are an excellent choice as they can withstand outdoor elements such as rain, sun, and wind.
Cutting the Wood
Dee chose to rip the pressure-treated decking boards in half to create five slats for the bench. Since she did not own a table saw, her husband helped her cut the slats using a circular saw. She also traced the top detail of the bench onto a six-inch decking board and cut it with a jigsaw.
Sanding the Wood
After cutting the slats, it’s time to sand them. Sanding the wood smooths rough surfaces and ensures that it’s ready for staining. Round out the edges of the wood to prevent any sharp edges and give it a finished look.
Drilling the Holes
After sanding, the next step is drilling holes in the slats to line up with the bench’s pre-drilled holes. The pre-drilled holes make it easier to attach the wood slats to the cast iron bench.
Step 2: Staining and Sealing the Wood
Dee opted to stain the wood to match the fence in her backyard. Staining the wood is essential to protect it from the outdoor elements and give it a polished finish.
Staining the Wood
Unlike paint, stain penetrates the wood, enhancing its natural beauty while adding color. Dee used a brush to apply the stain and let it dry for a few hours before proceeding to seal the wood.
Sealing the Wood
Sealing the wood protects it from moisture, which can cause rot and other damages. Dee sealed the wood with a clear coat to maintain its color and quality over time.
Step 3: Assembling the Bench
After staining and sealing, it’s time to assemble the bench. The wood slats are attached to the cast iron bench using pre-drilled holes. It’s crucial to align the holes correctly to ensure that the bench is stable and secure.
Step 4: Preparing the Area for the Bench
After assembling the bench, ensure that you prepare the area where you’ll place it. Dee dug a trench around the bench’s perimeter, lined it with cardboard, and then laid down mulch. This not only creates a barrier between the bench and the grass but also adds aesthetic appeal to the bench and its surrounding environment.
To Paint or Not to Paint the Cast Iron
Dee chose to leave the cast iron bench untouched to maintain its patina look. However, the decision to paint or not to paint the cast iron bench is purely a personal preference. If you want to change the color of your bench, you can use a power washer to clean it, use a wire brush to remove any debris, and then paint it using a primer and paint suitable for metal surfaces.
Conclusion
Restoring old garden furniture requires effort and patience, but the results are always worth it. In this article, we have learned how to restore an old garden bench. Dee from D’s yard shared her journey, showing us how she restored a beautiful cast iron bench with new wood slats. Remember, always select the right wood and protective coatings to increase the bench’s lifespan. Happy restoring!