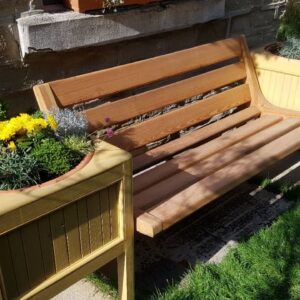
Remnants of Pitch Pine in Woodwork projects
As a woodworker and DIY enthusiast, it is common to have scrap pieces of wood lying around the workshop. Sometimes, these scrap woods are good enough to be reused for smaller projects instead of being discarded. This is where remnants of pitch pine come in handy. Pitch pine is a type of yellow pine wood popularly used for door and window frames, flooring, and furniture, but it is also suitable for outdoor use.
Most times, remnants of pitch pine contain splits, shakes, and other defects that make it unusable for most woodworking projects. However, with some creativity, one can make the best out of this wood by using it in garden furniture projects. This article will discuss how you can transform remnants of pitch pine into garden furniture such as planters and benches.
Main Planks for the Seat
The first step in making garden furniture with remnants of pitch pine is selecting the best pieces. Since most of the wood contains splits and shakes, not all parts would be usable. For a bench, the main planks for the seat should be selected by avoiding the major splits.
Repairing a Clean Split
Even though it is essential to avoid the major splits in the wood, it is sometimes necessary to make some repairs on the smaller ones. A clean split, which means the wood is split in a straight line, can be repaired by gluing the two parts back together. The woodworker can also cut a groove and insert a thin spline to strengthen and hold the wood together.
Cutting Domino Holes for Planter Joints
The next step after selecting the best parts of the wood is to start cutting domino holes. Domino holes are similar to mortises but are produced using a domino joiner tool. They are called loose tenons because they allow some movement in the joint, ensuring that the joint remains strong.
For the planters, the legs and rails for the top should be cut with domino holes. These pieces of wood will be joined with loose tenons to form the frame of the planter.
Making Half-Lap Paneling for the Planters
To make the planter look more appealing, some half-lap paneling can be attached to the frame. This is achieved by cutting a groove in the center of the rails. The paneling fits into the groove, and the frame can be assembled around the paneling.
Cutting a Radius into the Legs
The legs of the planter can be given a more finished look by cutting a radius into them. This is achieved by using a router with a rounding bit. The radius helps to blend the legs better with the frame of the planter.
Assembling the Planter
After all the parts of the planter have been cut, the next step is to assemble them. The loose tenons are inserted into the domino holes, and glue is applied to ensure a strong joint. It is important to check the diagonals of the planter to ensure that it is square. Corner braces can be added for extra support.
Finishing the Planter with Trim
Finally, trim can be added to the top of the planter, giving it a finished look. The plant pot is then inserted into the planter, ensuring its full support around the rim.
Changing Cutting Direction when Cutting Against the Grain
When woodworking, it is important to consider the direction of the wood grain. Cutting against the grain can cause splintering or tearing of the wood. To avoid this, the cutting direction can be changed to a climb cut. A climb cut involves moving the cutter into the wood in the opposite direction of the normal cutting direction before entering the wood. This technique helps to prevent splintering and produces cleaner cuts.
Using Leftover Beading
Sometimes, it isn’t necessary to buy new supplies for every project. Beading left over from a previous project can be reused to add some detailing to the garden furniture.
Making a Template for the Bench Ends
To make a bench, templates for the bench ends should be made. The templates can be made from MDF or any other material that can withstand repeated use. The template helps ensure that each bench end is identical.
Cutting a Radius into the Bench Planks
The bench planks should be given a similar radius to that of the planter legs. This will help ensure the bench parts blend together well.
Fixing Locations for the Brackets
To attach the bench planks to the bench ends, brackets are used. The brackets can be made from 6mm aluminum or 1/4″ aluminum for those in America. Pilot holes should be drilled for the fixing locations of the brackets.
Installing the Bench
Temporary screws can be used to support the bench for installation. After installation, the bench can be finished with teak oil to preserve the wood and a fine scotch brite can be used to smooth it out. To match the front door, yellow linseed oil paint can be used on the bench.
Planters and Bench in the Garden
After a few days of drying, the garden furniture can be installed. The planters can be filled with alpines, ferns, and flowers, while the bench can be used to relax and enjoy the garden view.
Conclusion
In conclusion, using pine pitch remnants to make garden furniture might require some creativity and skill, but it’s definitely a cost-effective, sustainable way to create beautiful outdoor furniture. The steps outlined in this article can be used as a guide to transform these remnants into useful and practical garden furniture. With patience, creativity, and the right tools, you can create beautiful garden furniture that will last for years.

