Hi! Sami here from CNC Router Parts.
This is a Pro-Tip video about tabs, how to place and program them into your
tool path and strategic placement of tabs regarding wood grain. Let's back up
for a second. Tabs are the little bridges that hold your final piece to the drop
material. They are simple and easy to program in Vectric's Vcarve or Aspire
programs. Stay to the end for a walkthrough on how to program settings
for your tabs. This is what it'll look like when the spindle is performing the
profile cut. It's a little obscured by the material but if we remove this you
can see the full tool path operation where the router bit will lift up to
accommodate the height and width the tab.
We'll attach our material to the bed,
here I'm using composite fasteners. Check out the description below for a link to
a video about this work holding technique. I'll zero the machine to the
top of the workpiece in the front left corner using our touch plate, we also
have a great video that goes into details of using this tool as well as
the fundamentals of zeroing. Then we run our program and pull out our pieces from
the material to see how grain affects the tabs in the final product. Here, if you watch closely you can see
the spindle lift up for the tab. Let's touch on how grain affects tabs.
One should consider the grain direction in the initial setup of your file until
paths. In general, when you cut wood with the grain it's more likely to split on
the grain and cut cleanly, whereas, if you cross cut a piece of wood it is more
likely to tear out.
This concept is relevant on a much smaller scale of tabs.
In order to prevent your tabs from tearing out on the back of your piece or
on the veneer consider the placement of the tabs. Putting them perpendicular to
the grain will make it so the grain goes across the bridge rather than lengthwise
with it so when you go to cut the tab it'll split across the tab nicely.
However, if you want a really strong tab you can consider placing them parallel
with the grain this will be less likely to break out when cutting on the machine.
Just take care when cutting or flush trimming them later on.
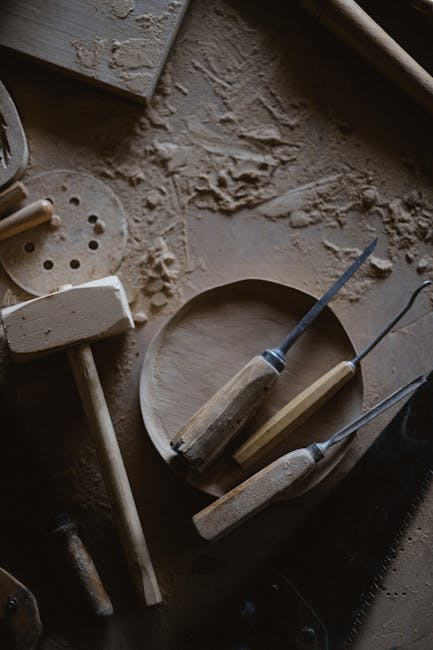
There are several
ways to separate the piece from the drop material.
This might include using a mallet and chisel which works well if you have a
large sheet that's difficult to remove from the CNC bed or you might use a
small hand saw, the bandsaw or jig saw to cut the tabs. All of these techniques
work better in different circumstances and the same goes for cleanup using a
flush trim bit is a great way to remove tabs. Though if the tab is parallel with
the grain is so possibility for tear out and you're more likely to avoid this if
your tabs are parallel to the grain. Alternatively, using a belt sander is a
nice option for flat and convex curves and it will be less likely to tear out. A
spindle sander might work well for concave curves. Thanks everyone for watching. Stick
around for the Vcarve walkthrough if you like. We'll have more pro-tip, project and
build videos coming your way soon! See you in the shop! This is our Vcarve walkthrough about how
to place edit in program tabs. I find it helpful to label the direction of the
grain in your file to assist when placing your tabs.
We'll go into our toolpath, scroll down
to the tabs box and check the box for "add tabs to toolpath." We have a few
options at this point, we can edit the size of the tab for the width and height.
I prefer using 3d tabs for wood and wood products. The triangular shape makes it
easier to remove them from the drop material as well as to flush trim later
on. 2d tabs are slightly more difficult to clean up but they do work really well
for acrylic and tend to chip out less.
Now if we click "Edit tabs" it will bring
us to this dialog box. Now you can hover over the selected
vectors with your cursor and left-click to add tabs wherever you'd like. Or we
can use the program to auto place tabs based on a few parameters " how many tabs
per vector," "distance between tabs and start points." Click Add tabs. As you can
see it's distributed them evenly but it has put some of them in inconvenient
places such as the corners of the vectors and parallel with the grain. The
auto place tab feature works ok for primitives but you're a much better tab
placer than the program. This way you can have control over how to place them in
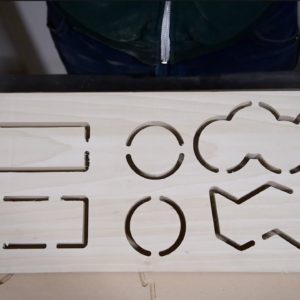
relation to grain and the geometry of the shape. For this first rectangle I'll
place all four tabs perpendicular to the grain this will leave a much easier to
clean up edge but sufficient enough to hold the piece in place. On the bottom
rectangle I'll place two tabs parallel with the grain which will be extremely
strong but more likely to tear out later on.
I'll do the same thing for placing
tabs on the top and bottom circle the bubble design while an odd shape has
surfaces on the top and bottom of the design that will likely clean up easily.
Now we're faced with a little bit of a challenge as we look at the zigzag shape.
The grain is at an angle but generally closer to parallel on all edges of the
part.
Looks like we don't have too many options here so we'll just have to take
care when removing this piece from the drop material. Now you might imagine that it's a little
frustrating to have to add tabs to every individual vector. If you're making an
array or several copies of an object consider creating a tool path of that
vector and then calculate. Then make copies of that vector when you reopen the toolpath and select those vectors you won't have to replace the
tabs on the vectors. I call this tab memory. Depending on the size of the
object two to four tabs is generally a good ballpark, however, I would add more
if it's a complex object.
In regards to size of tabs smaller tabs are easier to
release later on but a little bit more risky because they could break out and
get caught up in the spindle. When programming multiple profile paths or
tool paths that are overlapping they will not recognize tabs that are on
other vectors so you must align the tabs on the two vectors to preserve them. Or
one tab on the drop material between the objects rather than tabbing the objects
to one another. Preview the toolpath in the 3d rendering
in order to catch these mistakes. Thanks everyone for watching, we have a
couple more great videos coming out in the next few weeks so stay tuned and I
look forward to seeing you in the shop!.