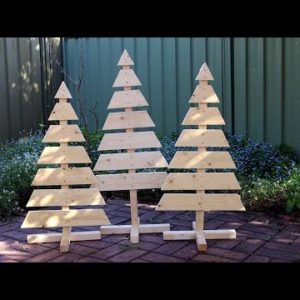
Welcome back to Tightwad Workshop A few weeks ago I was walking along my street, and saw this pallet outside a neighbour's house I very much liked the sign that he'd put on it, so it followed me home, and I kept it Let's lift it up onto the trestles to make it easier to dismantle I'll use this wood block and a hammer to remove the slats What the…? That's not normal I better do another to make sure it wasn't a fluke… It'd be nice if ALL pallets were that easy to dismantle… Once all of the slats are removed, we need to separate the long boards Then we can remove the nails, in the usual way Now we can lay out the slats and see what we have to work with The angle we use for the ends of the slats isn't critical, it just needs to be the same for all of them I'm guessing this angle that I'm marking is about 60 degrees Next I'll set my sliding bevel to that angle That'll let me mark all of the other ends using the same angle Now we can saw the ends with our tenon saw and bench hook So that's the top branch of our tree We want the next branch to be offset, and spaced a bit below it, like this We can do this by making the top of the second branch about 25mm (1") narrower than branch above it The width of our ruler should be about enough Once we have all the branches cut, we'll need a tree trunk I'll start by marking a line down the middle of one of the thick pallet boards Now we can saw it on the special ripsaw stool This stool makes the job a little bit easier, but it's still hard work! Now I'll use a plane to remove those saw marks from the wood Next we need to mark and cut the top of the trunk at an angle I'll do this by marking a line across the trunk, then use the top branch as a template Then we can saw the angles in the usual way Now we can cut the base parts to length The base is made of these 2 pieces One piece will be attached to the tree trunk with screws We'll also cut a small rebate to hold it more securely We'll also need a rebate on the bottom, for the lower base part to slot into The lower base piece needs to be rebated as well Once we've marked the cut lines more accurately, we can saw them out I like to make 3 saw cuts, because it makes the chisel work easier If you chisel from each side towards the middle, you're less likely to split the wood I'll finish off with some slicing cuts from the chisel I made the saw cuts a little too wide on this one, but once the screws are fitted it'll be OK Next I'll put the base parts together and mark the edge of the rebate Now we can slot the parts together to mark the second rebate I'll use the square to join the lines I'll also use the square to measure the rebate depth, Then I can transfer that mark to the lower base board Now we can saw and chisel the second rebate out, in the same way as before I did a closer job on this one, so the 2 parts are a nice tight fit Next we can screw the upper base to the tree trunk It's best to fit the screws 1 at a time, otherwise the parts might shift and move the holes out of alignment Next I'll sand the edges of all the branches Now we can mark the location for the top branch, and nail it in place The second branch needs to fit about 1 ruler-width lower down the trunk I'll mark a line with the square first, otherwise it might become crooked We can repeat this process for the other branches So now our tree is ready to stand upright Don't use glue in the base joint, that way you can dismantle the base to make the tree easier to pack away I had enough slats to make 3 trees, so I asked some neighbours to decorate them Jodie used a nice wood stain, and added Advent Calendar bags for decorations Her husband Dave painted his tree white with triangular decorations, and drilled holes in its branches to fit flashing lights Pip and her son Eddie painted their tree a festive green-and-gold, and used a string of colourful decorations Happy Christmas everyone, and please link a picture in the comments if you make one of these trees for yourself Tightwad Workshop is filmed in front of a live studio audience I SAID, Tightwad Workshop is filmed in front of a live studio audience!


