Welcome to make something
I'm David Picciuto today. I'm going to show you how to make this
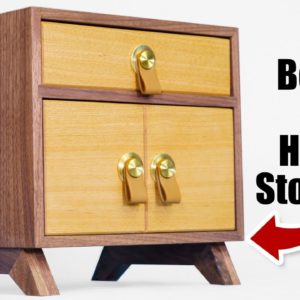
miniature cabinet with hidden storage compartment. Today's video is brought
to us by Squarespace. Check it. This is going to be fun. This
is one of those projects. You could batch out a whole bunch to sell
or make as a gift or even make it for yourself.
And I will have
plans available for this. I did not have Walnut wide enough. So I had to glue a couple
of boards together right now
it's about three quarters of an inch thick. So I'm going to run it through my
planner to get down to a half inch. I've got that plane down to a half inch
thick. And while I was at the planner, I went ahead and played down more material
for the drawer and the two doors that will be used in a later step. So the next thing I need to do is rip
and cross cut the four pieces for our outer carcass.
So now it's time to cut the miters on
all four pieces and I'm going to sneak up on that perfect cut. So I
know that on my first try, it's not going to go all the way to
the edge. So once I run that through, I will then nudge my fence over
and then run it through again, it might take two or three times.
Once I get that first edge, I can flip the board around
and do the other side. And on, on the parallel piece
that has the same length. All I gotta do is run it through once
on one side. And then once again, on the other side, basically
a miter joint, like this
is end grain to end grain, and that's not very strong if you just
throw glue on there because those fibers are going to soak up all of that glue. And I'm not going to put any
splines on there to reinforce this.
So a way for me to get around that is
to just take some regular wood glue and thin it down a little bit with
water. It doesn't take much. And then I'm just going to brush it on
there and then we're going to let that dry for an hour or so. The reason I thinned it down is so it
really gets in there and stabilizes the wood and will give us a nice
joint to glue up in the next step. And I'm going to do this
with all the mitered edges. Once all those have glue on there, we'll just let that sit and dry for an
hour or so. And we'll come back to it. I'm kind of doing things out of
order, but it doesn't really matter. While I'm waiting for this glue to
dry. I'm going to go over to the table, saw and cut the data's. That's
going to hold the center divider.
And then after that, I am going to
cut the rabbet on all four pieces. That's going to hold the back. I'm
just going to use a single blade, but in woodworking, there are
multiple ways to do nearly everything. You could do this at the router table.
You could also use a dado blade, run what you brung. You use what you got. I always like to sand all the insides
before gluing up it just makes life a lot easier. I've got some tape on the outside, and now I'm just going to start
putting glue on these miter joints. And don't forget to put in your middle
divider, which is going to go in there. Like, so take a brush, spread it around. I don't want a lot of squeeze out,
so I'm not using a whole bunch. And drop this guy in there, Fold this up, Let me get a couple of
pieces of tape ready.
Line that up. Get that
center divider in there. We can put a cute little drawer
there, a couple of doors here. And then on the back, we've got that rabbet in
there all along the outside. So we can put it back on there. And that's also going to strengthen
this since we aren't doing any kind of reinforcements on the miters and that
middle shelf was cut just a little bit shorter to allow that back to
sit on there it is the next day, it's a lot colder today than it was
yesterday. Welcome to fall in Ohio. So now it's time to work on the back here. And we had that rabbet
cut all along the inside, and we're going to put a
piece of plywood in there. I highly suggest using plywood because
that's going to stabilize the entire cabinet. You have three
options for the back. One is you find some Walnut plywood
already looks great and it fits in there. This is 3/16ths and it
is nice and flush with the back.
If you don't have access
to Walnut plywood, you could find some one eighth inch Baltic
Birch cut to width and length and set it in there. And it has a nice
little decorative insect right there. And it's contrasting if
you want it to be Walnut, you can veneer this and I
don't have any Walnut veneer, but I do have some cherry. So I'm
going to show you how I would do this. If I was going to veneer this with some
Walnut veneers. this is a great trick. If you don't have a vacuum press, I'm going to take my one eighth
inch Baltic Birch plywood.
And I'm just going to brush on some
wood glue, just regular wood glue. Let that sit and dry.
Same thing with my veneer. I'm just going to brush on some
wood glue and let that sit and dry. Once the glue is dry, I can take my veneers and position it
on the piece and use an iron to iron it down. And it's going to melt that
glue and you will have a nice, beautiful veneered sheet of plywood. That's a great little
trick to veneer plywood. So now that this carcass is all done, I am going to make the
drawer and the doors. A slight change of plans.
And by slight, I mean, a pretty big change of plans. The original thought was to
have a drawer right here, and then two cute little doors
that opened up down here. And those little doors would
have this pin on there. And there would be a hole drilled
in here and here and here and here. And that pin would ride on those holes. Turns out I can't get my drill in there.
Cause this opening is not big enough. Now I could use brass hinges, but it
wasn't something that I was planning on. And so to make this a little bit more fun, I'm going to make this one big drawer
that has a hidden compartment in there. It's going to make the
project that much more fun. And plus I might do a little divider down
the middle of that big drawer to make it look like two doors. I always love being open to calling
an audible when a project needs it. And I think it's going to make
this project a lot more fun. So one little drawer and one big drawer. And they're both going to use the same
mitered corners and a plywood bottom as the outside carcuss.
So
let's go cut those up. So the drawers are done made out
of all Walnut except for the front face, which is made out of
Hickory. If you're doing this, I think maple would also
work. If I push these in, you might see some
inconsistencies in the gaps there. And one way to hide that is to add
a little champer around all four edges of the drawers here.

Uh,
you could also use a round over, but I always prefer champer. I think
it looks classier for what I do. And then I might also route a little V
groove down the middle here to give this the illusion of two little
doors. Maybe it'll work, maybe it won't work. Everything
is experiment. Rule #4, We got that champion around the outside
edges and it hides those inconsistencies and adds a nice little look to it. And then I got the divider down
the middle of the big drawer.
And then if I put a handle
here and a handle here, it's going to keep the same
vision that I originally had. So now we are going to work
on the hidden drawer part. We're going to put a rail here and
a rail here and a false bottom. That's going to sit on that rail.
And if you just open up the drawer, you would never know that there's
a little hidden section in there. I cut two of these rails with
a 45 degree angle at one. And if I glue these to the bottom of
the drawer and then put it in our full bottom, it just looks like a normal
drawer bottom, but I can press up here, pull this out and reveal the hidden area. It's now it's time to make
the legs for this guy. The legs are an inch wide and I only
have half inch Walnut stock left.
So basically I'm just going to double
this up and glue pieces together. I've got my templates printed
out and it's in three pieces. This is a very mid-century modern style. And the reason I have it in three pieces, instead of one is I want the grain
direction going in a certain way for each piece And just like the drawers and the cabinet. These are basically end grain the end
grain. So it put some blue on there, let that dry. And now I'm going
to put some more glue on there. These are at an odd angle, so
it's hard to get clamps on there. And that's where painters tape comes in real handy after that dries
for about an hour or so.
We'll sand that down and I'll just
put a little glue on the top here and glue it right to the bottom. If you have any gaps in the
miter like I do right here, we're just going to take a
little bit of glue, not much, and then take a screwdriver and you just
kind of round that over and it's going to close that gap. It's now time to put some finish on here. If you think this is
going to get some abuse, you're going to want to use
something like a polyurethane. I'm using this overpriced Odie's Oil. And the reason I like this is
because of a couple reasons. One, I like the way it looks. That's
important to me. It smells amazing. I know that's really weird
to say.
Uh, and also, um, it dries right away. So I mean, I
could put this in the house tonight, if I want to. And while
I am putting oil on here, I would like to tell you about today's
sponsor. And that is Squarespace. I know a lot of you are like me, you're a woodworker or a
crafter or an artist or maker.
You need a place to show off your
work either to get clients or to sell. And Squarespace is a
perfect solution for that. Here's what you're going to want to do.
You're going to go to squarespace.com. You're going to start your free trial
and you're going to play around with it. And you're going to see how easy
it is to use and set up pages and galleries and all kinds of stuff. A contact form you can bring
in your social media feeds. And when you are ready to launch you,
visit squarespace.com/makesomething.
That's me. And you will get 10% off your first
purchase of a website or domain. I like Squarespace so much
that every website I operate is a Squarespace site now
thank you to Squarespace for making these videos possible. Thank you for Squarespace for making
my website so easy to use an update and thank you to you for sticking around. And then I'm using like the, uh, the body filler scraper to
just move it around so I can get as much use out of it as
I can, because like I mentioned, it's a little pricey, but I like it.
Sometimes I like pricey stuff. I am a man of luxury.
There it is all completed. I waxed the bottom of the drawers. So they slide in and out with ease
and then added the drawer pulls on there. And I really, really
love the way this came out, links to all the equipment and
materials that I use down in the video description. I will have plans
available for this on my website. I've been told I have some of
the best plans in the business, even better than some of the magazines.
My plans are very easy to read. It's one step per page
and it's well illustrated. And it goes step by step with everything
that you need to do to make this. And this is a pretty easy
project with the miter corners, no fancy joinery at all. Also
on my website, I've got merch, I've written three woodworking books.
It's getting to be Christmas time. You might want to make some gifts.
So those books might come in handy.
And I also have this really cool poster. I designed with a fraction to
millimeter, to metric conversion chart. This is complete. This is done, but I might make a second part to
this video where I do some inlay on the top and the sides. And then also add some sort of
texture to the drawer faces. So I might break out the shape or
origin and have some fun with that.
If you want to see that video and see
what we can do to enhance look of this, let me know down in the comments. If
that's something you're interested in, I know some people don't like the CNC,
but that shaper origin, it's pretty cool. It's a handheld CNC that
does some really cool things. If you think I deserve it, hit that like
button and give me your subscription. I put out all kinds of
fun woodworking tutorials. Then I also have a second
channel that I'm reviving. That's going to have some
auto body work and everything. That's just kind of not related
to what I do here in this shop. So you might want to check that
out. That is going to do it. We'll see you all in a few days with
another woodworking project as always be safe, have fun, stay passionate, be
nice to each other and make something.