Hi, it's Wray from ProShaper
workshop in Charlton Massachusetts, we're back and we got a little
different project. Today we got a pretty sexy little motorcycle gas tank, it's uh
very tear droppy, and the problem was this tank, the guy that owns the bike, like the shape of
it, and it's got to fit the bike, but this was uh blow molded, it's PVC or something I don't know
some kind of plastic and it was leaking from day. One had a really nice paint job on it and the
gas leaked and caused all this paint problem. So he commissioned me to make one out of 18-gauge
steel and it's a pretty complicated tank to make. These are pretty extreme uh compound
curves on both sides and I’ll show you.
We got a lot of that all done, but actually
the most complicated part of the whole tank is this interface. It has the tunnel for
the tube, that's not too bad. We got that almost done, but these pieces here have
to be exactly like they're configured. So everything will all weld together and the way
I plan to make the tank uh this tunnel is one piece. This is going to be another piece
and this is going to be another piece. I probably will weld something in
for this and there's four mounts: they use the little rubber one-inch mounts with
5 16 threads on them. I believe there's one here and one here and here and that's all fixed on the
bike, so we can't change anything and it has to be perfect so that it just pops right on and then
for some reason, there's access to the tank here I don't Even know what that is, but this is the
equalizer tube so that both sides can drain out, and I believe that's where the petcock is,
so all that stuff has to be in the right spot and to make this is super complicated.
So
I made flexible shape patterns and I was going to make gauges but to get it to all line
up and everything says I need. I need a buck well to make a wooden buck of that it would be
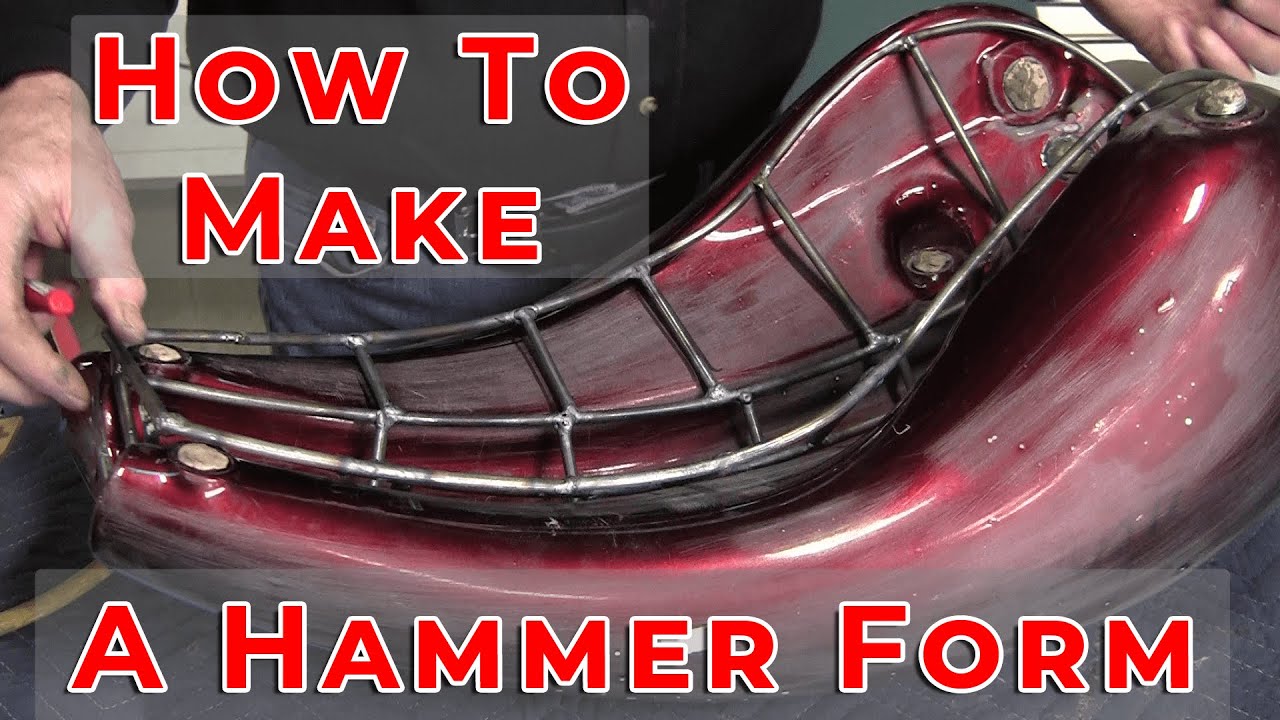
just crazy. So I says I know what I’m going to do. I'M going to mold one of my copy box and first
step of making a copy buck is to make a wire form. This is quarter inch wire hot roll wire.
I bent it up now. This type of wire form doesn't have to be absolutely perfect. All it has to
do is sort of fit in the space there like that, and I want to pick up all the surface
information which is incredibly complicated, so the what I’m going to do
is after I’ve made this now.
This is uh all MIG welded and then a few of
them. I tig welded together. So it's a really strong assembly and I am going to wax this. Then
you put this in the wire form and this is the exact same thing as uh. Reinforced concrete,
like the wire, is like the rebar in concrete. It creates a real, great strength for
the bondo I’m going to put in here and I’m going to put a wax as a release agent
and then I’ll be able to mold this thing and pop. It out – and that will be the negative
of this well actually, the positive, that's the negative and now I’ll be able to fit everything
on here and then I’ll be able to tack it up, and I probably will have to do something similar to
the sides in Order for that all to come together, that's a really complicated tank. So I can't put
any bondo in here yet because I have these holes, so I’m going to take clay and then it has this
little groove system in here and I looked on the bike and there's no there's no reason for that.
So that might have been something they had for the manufacturer or something I’m not sure why
that's there, so that could cause a problem of the bondo sticking in there.
So I’m going to
take clay and I’m going to clay around that. I got to clay all these holes up clay, these
holes up and I’m going to get that done first and then we'll come back and you'll see how I
cleaned it all up. Then it's going to be waxed, then we'll mix up the bondo pop it in
and you're going to see the end result, which would be pretty cool all right.
We got the clay and now we're going to just fill these up, I’m going to
probably leave them a little domey, so you might ask where'd this idea come from. I call this my copy buck idea. I
developed this over 20 years ago. More than that, probably uh, probably
almost like almost 30 years ago, I made XK Jaguar parts for 120s, 140s and 150s, and I had a friend that lent me all the pieces
he had collected like 17 of these XK jaguars, and I needed fenders and everything Else,
well, he let he let me borrow all of them and he had bought them all super cheap and
dismantled them with the intent of restoring them. I think, actually he only restored one out
of about 17 of them.
He sold it off all the stuff off. Eventually – and I came to the
crossroads – I got to make some bucks, so I had made one buck out of wood in my entire
life and after I made that wooden buck, I said, there's got to be a better
way. It’s the craziest system. Not only is it the real pain to make it you
really, they have very bad usage that to be able to use them to make the panels on them. It’s
just a nightmare, so I read a magazine article or something about this guy that was trained. I
believe in England and he was a wire form guy and as soon as I saw the wire form, I said,
that's a cool idea, so wire forms I really like. But now I had this problem of trying to make
re-offenders for a 120 rear fenders for a 140 rear fenders for a 150 jag, and I said I’m going
to be about four years making just all these wire forms because you'd have to bend each wire
super.
Precisely in order to ensure that you had a really accurate representation of the shape –
and you didn't want to sell offender to somebody ship it to California, and then the guy puts it on
the car and it doesn't fit he's going to be mad. He’s going to get on the phone demand his money
back and then you got to ship it back. You know, so I didn't want to get into that nightmare,
so I knew my parts had to be perfect, so otherwise it was going to be trouble.
So I came
up with this idea of molding the parts so actually the first one I molded was with regular standard
polyester resin, auto body filler, which everybody calls bondo, because the original uh manufacturer
of polyester resin was called bondo and actually it was a cool Little side story on that is the
original creator of bondo was a guy that lived one town over from the town I grew up in and
he had a actually a manufacturing facility in the town I grew up in which was Shrewsbury
Massachusetts and it was Called unican plastics and he created bondo in the uh in world war
ii. He came up with the idea of combining polyester resin with talc. Talc is the softest
mineral that it's in that's out there and it makes this really wonderful, add subtract
medium, that we call bondo or auto body filler. So I had a bunch of experience with auto body
filler. So I knew that if I molded with that, I might have some problems with the thermoreactive
aspect of it.
So the first one I did, I molded it off of it inside of a jaguar fender and when
it hardened up it kind of twisted on me – and I goes well – that's not too good. So I said,
hmm reinforced concrete. It’s got rebar inside. I wonder if I could just make a quarter inch
wire form that doesn't have to be super precise and put the wire form on the inside of the fender
or whatever I was making and then mix up the bondo and mix it all around the wires. I said
I think that'll work so a couple hours later, I made the first copy buck and I ended up making
all of the jaguar, fenders and all kinds of pots. I made these copy bucks and, if they fit the
coffee buck was made off the inside of a really good part.
It had to be super accurate and if
I made the panels fit that I knew my panels were going to fit, I never had any returns.
People were always happy with my quality, so it turned out to be a pretty good deal,
and today I don't make too many copy bucks, but here's a situation where other than
kind of guess guessing there's no way. I can get accuracy on this. Unless
I do something like that, so that's what I’m going to do so we're filling these
holes all up with clay. So we don't get bondo inside of this tank and we don't get locked in on
it. So I’m making these little dome shapes here and then the next step is I’m
going to wax this whole thing and then we're going to mix up a lot of the
bondo now the bond that we're going to use. Originally, I used just straight polyester resin,
but this has the little super fine glass hairs.
They call it waterproof bondo. This is
like twice as strong as the other stuff, so I use that exclusively now for doing these and, if you're, making a buck that you're going
to make say any kind of pot over and over again and you need a buck to make multiples.
This is a really good system to do that. So we'll get all this clay in here,
I’m just about done with the clay, and then I’m going to set this in here like
this, I’m going to, I got to get to go, get a black magic marker.
I think, unless I can see
this one, I can see this – I guess and where this is now, I’m going to take and mark this like this
and that's where all the bondo is going to be. So we don't want this right on the surface,
so we're going to set it off the surface just a little bit. So we'll put a couple pieces of
wood under or something just elevate it about an eighth of an inch off the surface.
Then
we'll mix up a whole bunch of bondo and fill all these little spots where the where the magic
marker lines are where the wires are going to be, get it all there and then we'll just plop it in
right like that and then we'll build It up a lot more. We could actually fill that whole tube if
we wanted to, but we don't need to, but we could we could come in later and do that too. If we
wanted to so let me get the clay finished up and I’m gonna get all these lines in
and then I’m gonna wax it all right.
So we uh, we got all the lines in there.
That’s where I’m gonna put the blobs of bondo and right now we're going
to use the wax. This is a paste wax. It’s a hard wax, we'll
put a couple coats of that on there and that'll ensure that we can pull that bondo
out because it'll act as that release agent. Now I’ve done many, you know probably 50 or 100 of these things through the years
so and I’ve never had any problems with using this paste wax as a release age – and
I know they do make special release agents. I never had to buy it, though so we'll wax this
all up, really good, make sure we hit every surface we'll. Do it two or three times and um
we'll leave the wax on and we won't even actually uh wipe the wax off or anything.
We’ll leave. Leave it nice thickly coated all right,
we're going to open up the bondo and let's make some bondo the resin's
all at the top here. So I got ta. It’s been hanging around a little bit, so I gotta
mix it all up. So we'll get it all mixed up and we'll be back all right. We got it all mixed up
the resin and the solids have joined. We got a nice creamy consistency. We got that wonderful,
bondo smell, I seem to be acclimated to it. I’ve used a lot of bondo over the years, but now
I feel that bondo should never be used on cars. So if you bondo your panel
work, that's like giving up, you should be able to get that panel work perfect,
especially if you've got an aluminum body. You can polish the whole thing.
It just looks perfect,
so I’ve become used to the bondo smell, but you know if I opened up one of these cans,
even in my garage at home or in my basement, or something to be about two minutes
before my wife. Would be yelling? What’s that smell, I think that's universal
women just hate the smell of bondo. Let’s dig this out. We should have a putty knife. Maybe mark can go, get a putty
knife that should start us off now. You have to admit it's much
more honest to make your car body out of a piece of metal than this stuff, so you
know, take the challenge on and learn the skills. So we got about four minutes five
minutes to get this where we want. We want to make sure we don't see any
greener, we got it mixed up, really good and let's see if we can get this done so I
want to just blob this in wherever I got the it's all right.
If I miss it too, but I got
a target there, where it's all magic marked. This is where you don't want any phone
calls. I don't have my phone with me, though, this typically when the phone calls the cell
phone always rings at the most inopportune time. I put about four coats of wax on everything, so, if I did it right, it should pop out, if I did
it wrong, it won't pop out that'll, be scary. I guess I guesstimated the uh the amount of bondo
pretty good too.
I think I’ve done this before all right now I made these little wedges.
I'M gonna put that little wedge right there and the other one over here and then we're
gonna plop this in here just like that. We’ll get a paper towel and we got ta mix up. Another big giant batch of bondo and the object now is to kind of like get
all this bondo right around the wires. So another batch and will
lock all those wires right in after about a half hour or so exposure
to bondo fumes.
You do get a headache or I do so. I don't know if I’ll
get one, because we're not too long with it, but quite possibly
it could happen we'll see. Hopefully this is the last
one batch we've got to make. This is kicked already so now
this will all marry together. We'll start at the back and
work our way to the front. Um took the little wood wedges out. We don't need
those anymore and see if we can get that out mark, maybe a pair of pliers. Anybody out there, music lovers
uh and you listen to Spotify, my daughter's a singer and one
of her band projects is called.
The band is called love crumbs, so they just put
a single out and it's on Spotify and just look up. Love crumbs on Spotify and the song is Cavalcades
and listen to my daughter. Go to Allison looks like we're going to need a couple more
batches. I'M filling that tunnel up quite a bit. It has to be in order to get it to pick up all
that shape nicely and get it around all the wires. Hopefully we have enough filler here, that's what we call a big-ass batch of bondo. Hopefully I get it on this one's green because I
use the blue hardener, so start typing saying I forgot to put the hardener in.
I have maybe
done that once in my life, when I was 12 I just hope this thing comes out. If it
doesn't come out, I’m in deep doo-doo. This is going to be more exciting than Al Capone’s closet there that Geraldo
Rivera was trying to open up. I think the headache is about to start a lot of fumes. All right there's a few spots
left. I think I should put some more on so I’ll mix, one more small batch all right. So
here's the last batch and blobber in their tank weighs about three times as much. Now so hmm it's running when your bondo runs. That means you got enough all right. So
I think that was what two and a half to three and three and a half batches.
I
think that three and a half batches, always clean your tools off
every bit of it. We use it all, that's it now. We just got to sit back and wait
a few minutes, probably about 10 minutes, we'll let that harden up and then we'll see whether
the gods smile at us or laugh at us all right. We got this uh all kicked now. I think it's
hot. It’s probably about 150 degrees or more and let's cross our fingers and see if we can
get this to pop. I heard something that was good, hopefully didn't hit any uh negatives. We
might lose a little bit on the edges here, but there might have been a few spots. We didn't have the wax too fully. Oh, look at that. It’s moving. Oh,
it broke loose on one side so far there we go. Let’s see the moment there. It is look at that baby perfect. We have
a mold, that's reinforced with steel. That’s super accurate! Try to make that in a
wood, buck ha ha ha.
So that was a success. It even lifts the magic marker. Look at
that the magic marker lifts right off of the plastic tank. Now, how would you
do that any other way? So now I got a really accurate piece. I can fit my
steel pieces to so that I can get all the welding done and everything I’m gonna
have to make a little separate piece. You could extrude that in there, but that's
a lot of work, so I think I’ll just make a separate little piece for that and I got all
my locations. This is my mount points for the rubber bumpers. The
mount point right over here right there. I did miss, I didn't get enough bondo
in here. That’s where the crossover piece is. Oh boy. No! Is that the mount?
No, that's the mount, oh boy! Well, I can put it back in
and get that if I need it. So I think, overall, that was a pretty good
success and we used about a full gallon of bondo, so remember to uh. Please subscribe we're
trying to build a channel.
Tell all your friends spread the channel on all your car clubs and in
forums and keep the comments coming you're going to see some pretty cool stuff at the pro shaper
workshop. Thanks for watching its Wray Schelin.