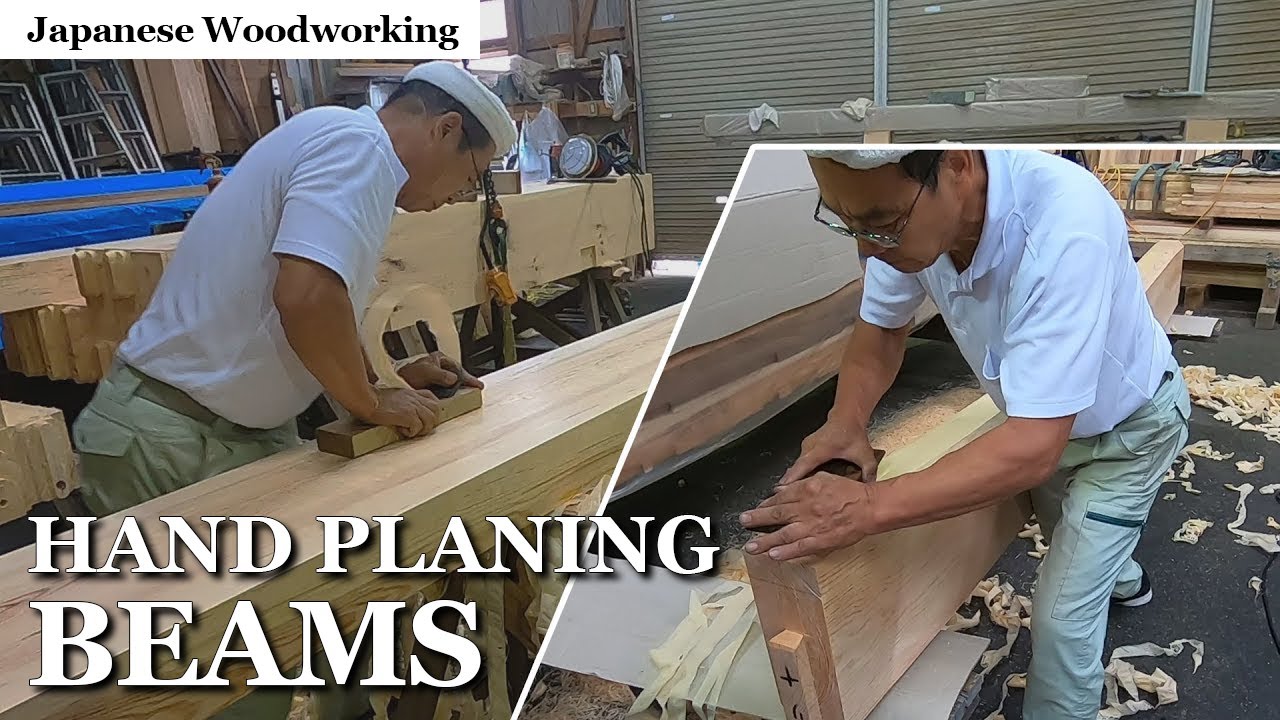
Finish beams by planing Hello, this is Shoyan, a Japanese carpenter. Today, I'd like to show how to plane timbers. There are curved timbers, large timbers and many kinds of timbers. I'd like to plain all of them. These are my planes. This is the curved plane called "Soridai". This one is called "Arashiko" or "Banarashi" which is used after electric plane, to make the surface straight roughly. Then, finish it by this kind of plane. Before starting it, sharpen the blade of the plane.
How to sharpen blades depends on a person. A long time ago, when I saw many carpenters sharpening blades, it was interesting that each carpenter had their own way. First, plane the timber by electric plane. Erase the marking which I drew and polish small scratches mede while cutting it out, by electric plane. Then finish by manual plane. The setting of the electric plane blade was wrong a little bit, so, the surface needs to be modified. Maybe it will take time to make it straight. Now, the surface is straight. then, complete it by plane for finishing touches.
I haven't used this plane for a long time, so, it's not in good condition. Maybe, it will be getting better soon. There are many videos that show how to finish straight timbers by plane. But in fact, we carpenters have to plane the timbers that are originally curved or rugged, after making them straight by electric plane. So, this work is hard actually. In the first place, the purpose of planing is to make timbers glossy. By planing timbers, resin appear on the surface of them. That resin is water repellent, and also prevents timbers from getting dirty when they are used outside.
That resin works like coating, so, it prevents stain from soaking into timbers when wiping them. So resin has the function like coating. That's why we have to plane timbers. Now, I finished 1 surface. The top side gets glossy by planing toward this direction. But the bottom side gets glossy by planing toward this opposite direction. This is because of the character of timbers. The direction of planing to make a timber glossy is different between right side and left side. I have been told that a professional carpenter doesn't have to change the direction, for a long time. But I still think that it's better to change the direction to make it clean. I can guess which direction is good to planing to make it glossy. But I cannot be confident before planing it actually. Then, plane the bottom side. The bottom side is curved, so, finish it by curved plane. The curve of the plane is sharper than that of timber. If you pull the plane slowly, the surface will be rugged. So fix your wrist not to move, and pull the plane fast.
Next, finish the top side. The top side sticks out, so, it's not very difficult. It can be finished by normal plane easily. OK, now it's completed. You can see it's glossy. Next, plane the beam that I connected in the last video. Let's finish it by plane. Modify the shape of the beam as well, then finish it by manual plane. If you connect 2 timbers in a workshop, of course, the length becomes 2 times. The difficulty of planing also becomes 2 times.
But if I connect them in the site, that erection work will cause some damages and misalignment. That means, it's necessary to modify it by planing once again at high places on scaffoldings. It's very dangerous. So, even if it's difficult to plane connected timbers, it's better to connect and finish them in workshop in advance, to make it clean looking. The finished surface becomes the bottom side after turning it, so, put shavings on the stands to protect the finished surface.
Ok, now planing is completed. This beam is made of 2 timbers whose grain and characters are opposite. So, it was very difficult to plane it. Then, let's plane the straight beam as well. This beam is made of the portion called "Akami" that is the center portion of the section of logs. The beam made of only this "Akami" portion is rare and luxury. It will get glossy by planing well, so it's very worthful. I still have many timbers to plane today, but let's finish this video. I hope you could learn planing that makes timbers get glossy and beautiful. That's all for today's video.
Thank you very much for watching this video. Thank you for watching. Please subscribe and please thumbs up..