Welcome to Make Something with me. David Picciuto and today I'm going to
show you how to make your own inlay banding, to take your woodworking
to the next level. Check it! Today's video is brought to
you buy Dollar Shave Club. We're going to talk more about
them later. For this first one, I'm going to use this beautiful piece
of zebra wood that I got from Kencraft, So we're going to cross cut little thin
strips out of this and then glue them together so we get perpendicular grain. I have this magnetic stop on the top here
so I can butt up against that and then run that through and that should
give me some nice thin little pieces Now that we have all these
thin little strips cuts, I want them to be sandwiched with a
really thin little piece of soft maple. So again, we're going to take
this over to the table saw. I'm going to use this as a stop to run
this through to get repeatable small strips. Now we'll sandwich that with thin pieces
of dark wood.
We'll use Ebony for that. We have everything cut. We're
going to take the zebra wood, we're going to sandwich it in between
the Ebony and then a couple strips of maple. So now we're going to take these
spring clamps and a clamp it together, Jed Clampett. Now that the
glue is dry on these guys, we're going to get one clean edge. We're just going to cut thin strips off
of this here to table saw and it's going to be your final piece of inlay banding. This one, I want a checkered pattern, so I have this piece of Ebony here and
I think what I want to do is resaw it in half and then cut up squares and then
I'll do the same thing with a contrasting wood as well.
They're the same thickness. I'm just going to glue them
together. Glue up is dry. All I'm gonna do is I'm… Again, I have my stop set up here and my miter
gauge and there's going to butt up against there, cut off a piece, but up against their cut off another
piece and then we will glue it up into a checkerboard pattern. So now we have all of our
pieces ready for glue up. We're going to use some
tape to make this easier. I need to sand down that flush. Take a piece of maple
veneer, cut it to size you can cut off the thin
strips just at the table saw or if you have a really good
resaw blade on your bandsaw, you can do it here as well`. so for this one I like how the grain on
the end here is going at an angle and I figured if we cut a bunch of pieces
and then flip one we can, can we get like a little arrow pattern.
I'm just kind of winging it here. I don't really have much of
an idea where I'm taking this, getting a nice flat surface there and I'm
going to cut the middle strip out over here at the table saw and
I've got my middle line on the outside of the blade. I think. I'm just thinking
you use a piece of maple veneer that I have and just
cut a couple of strips out of this. Oh yeah, that's going to look good. Hey, Hey. Hey, cut. I'm going to use some pieces of
plywood as calls for the glue up. That's gonna make it a
little bit easier .tape. So any glue squeeze out does
not stick to the plywood calls. We came up with a really,
really easy one to make. If we're going to take
some quarter inch plywood, some of the good stuff with a lot of
layers and just sandwich that in between two pieces of mahogany. When you're gluing it up. You want to make sure they're somewhat
flat on one side so you can run that along your tablesaw fence.
And for this last one, we're going
to use three different species. We've got some mahogany, we've
got some Walnut and some maple. We're going to cut up a bunch of thin
strips and then glue them together, cut them at 45 degree angles
and then glue them together. Maple mahogany, Walnut, maple, mahogany Walnut, and we need to glue
them up together. But before I do that, I'm going to chop off 12 inch segments
so I can gang up another set of maple mahogany, Walnut, maple, mahogany, walnut. I think just the spring clamps
are going to work on this one. If you have a drum sander, that's going
to be the easiest way to flatten this. We are just going to sand it
down with a random older sander.
It's time to cut the pieces. I'm putting some masking tape on there
so the small pieces don't fall in there. I've got my miter gauge set to 45 degrees
and I'm going to start by making a 45 degree cut here, setting up a little stop and then
cutting a bunch of thin little strips. I want to go about a quarter of an
inch past that kerf.

Set up my stop. Make sure you're using some sort of
fancy exotic expensive woods for that. Otherwise it won't work. We're playing with the patterns here. I think we're going to do a couple of
strips of the maple mahogany Walnut, maple, mahogany Walnut, and then we'll
sandwich that in with maybe a veneer. I'm gonna get a couple pieces out of that, but Dan was playing around with this arrow
so this glue-up is a little tricky so I'm just going to do one piece at a time
and kind of glue them up that way with some CA glue. This one we're going to do the arrow.
This is one of those projects you can
experiment for days just cutting up different patterns and the more you do it, the crazier patterns and the more you
kind of understand what the finished piece is going to look like. There are two ways to use this banding. One way is to use veneers and you'll
have your plywood or whatever wood that you're using for the piece and
you'll lay down a piece of veneer. You glue that in, you
take a piece of banding, you glue that in and then another
piece of veneer and then you can sand everything down flush. You can also take the piece to the router
and route a groove in there that the exact width of your banding and inlay
it that way while we're sanding it and doing some final finishing
on the inlay banding. I'd like to tell you about today's
sponsor and that is dollar shave club. I have been a pane member of dollar
shave club since 2012 and I know you're asking yourself why would you pay for
dollar shave club when you got that gorgeous beard? Dan was actually
asking me that earlier today.
I shaved my head in the shower a couple
of times a week using their razor and their shave butter. We all know dollar shave club has you
covered for all your grooming needs, shower, oral care, deodorants,
and most importantly shaving. And this holiday season they have your
back for all your gifting needs for members favorite gift sets
to gift cards to roblocho. It says roblocho. It's
a combination of a robe, blankets and poncho. I got to get
that. I gotta get that. Kelly, you're watching. I need a roblocho set. Struggling to figure out what to
get your significant other dad, brother or anybody else on your
list. You found it. This is it. I'm supposed to show you the unboxing of
this, but because I'm a paying member, I thought this was my
actual monthly package, so the starter kit comes with
this executive handle and blades. This is good stuff people. This is
what I use every single week. Also, you get an ounce of the shave butter, there'll be a link down in the
description or you can go to dollarshaveclub.com/makesomething and get your $5 starter kit or any one
of the gift sets that we talked about earlier.
Thank you dollar shave club
for making these videos possible. Now let's go check out this inlay banding. All of this beautiful wood came
from my friends at Ken Kraft. You can visit them at kencraftcompany.com
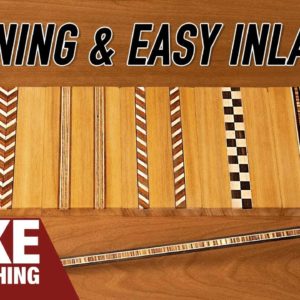
and they do sell online. Really, really happy with the way
this came out in the past. I have purchased my own inlay banding
and I've used it on various projects. I think recently we did it on the Ben box. It really just classes up the
boxes and the pieces that you make, endless combinations. The
more you play around with it, I think the more creative
you can get with it. You can turn an ordinary picture frame
into something absolutely beautiful.
This checkered piece I also recently
used in the making of a trophy for a go-kart race that has already happened. I actually raced in that race for that
trophy and didn't win it more on that later. A whole video on
go-carts. It's going to be crazy. We're quitting woodworking. No more
woodworking Dan. That is it folks. We'll see you next week with a brand new
project as always, be safe, have fun, stay passionate and make something..