Tonight I’m gonna show you some common mistakes
that people make when using a router sled. I'm working on a project right now that required
me to use a router sled to mill off the top surface of a big slab of black walnut. This slab started out at just under 3 inches
thick and I've taken it down to about 2 inches. At this stage I haven't done anything except
for routing so the surface finish you see on this board right here is before sanding,
before hand planing, before anything else. It's just what came straight out of the router. Now at the end of the day most of these mistakes
will not ruin your project they just make it so that you have a lot of cleanup work
you have to do afterwards to get the surface smooth after routing. The first thing you know need to know about
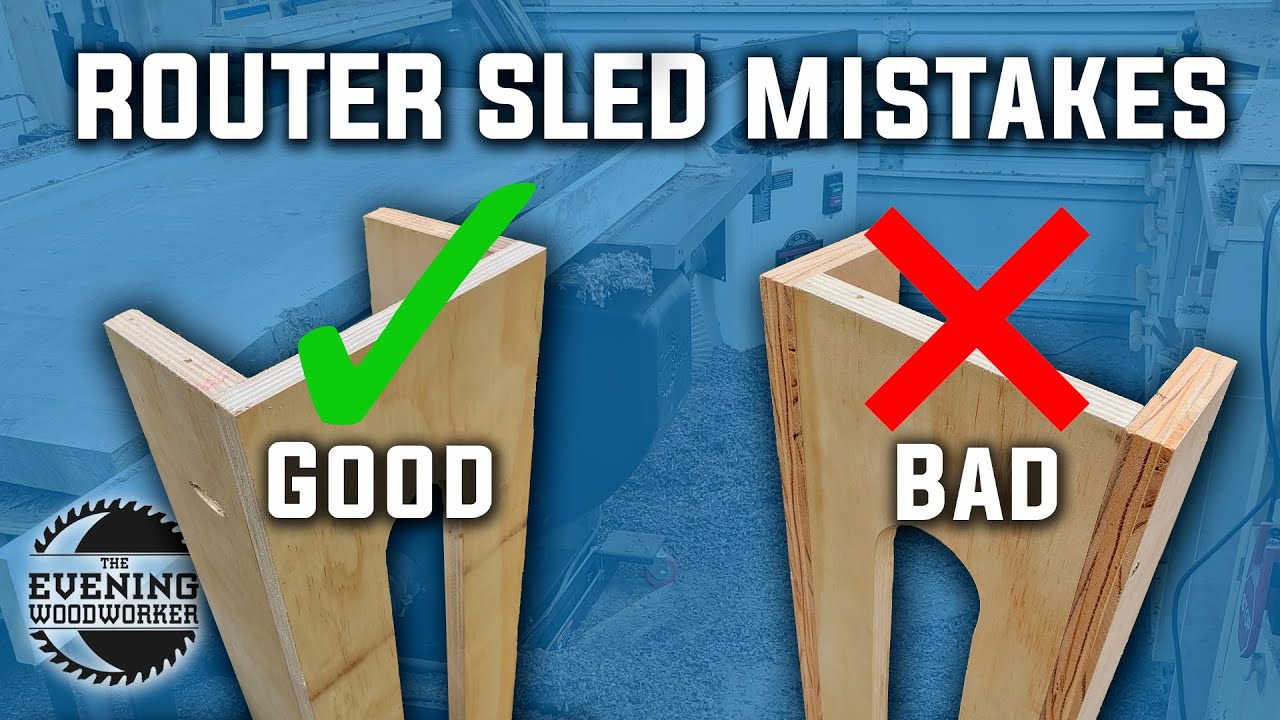
is router sled design. Now this router sled here is a design that
I made that has a flat bottom here and the sides of the router sled are screwed on from
the side like this.
It seems pretty simple and seems like a straightforward
design, just make sure the bottom is flat and you should be good to go. This design is a problem. On the router sled you have 2 indexing surfaces. One is this outside edge that rides along
the rail of your router sled. That one needs to be perfectly flat and smooth. The other one that is critical is on the inside
of your router sled. Your router is going inside and it’s sliding
back and forth on this surface and whatever bumps or variations you have in this surface
all of that will translate to your finished piece because this is an indexing surface. So when you put this together in this way
the screws are coming in from the side. What that does to the plywood is right along
the edge the plywood expands just slightly when you put a screw in it. You may not see it but if you put a straight
edge along that you'll probably see a gap and some variation.
Right now if I run my fingers along this quickly
I can feel the bumps in here from the screws. Sometime it’s the screws, sometimes it’s
just the variation in the plywood surface. If you make a router sled like this you’re
compromising your indexing surface. Now let me show you a better design. In this design your two indexing surfaces
are on either side of the same board so you have this one which is where your rails ride
and then on the inside this is where your router rides. Now you don't have the same variation in this
inside surface as you do on the other one because of the way that you're attaching the
sides to the base. The sides come in using pocket holes. Now what this does is it makes it so as you
put the screws in you pull the bottom indexing surface up tight against your plywood edge.
This plywood edge I'm assuming is going to
be cut on a table saw so it'll make it nice and square. When you run your router along
the surface and when I run my hand along it I feel no variation at all on there. There’s no bumps, there's no waves or anything
so that means I have a nice flat surface that’s going to translate to my slab when I start
routing. Now one of the designs you can do is to build
the lip that will hook on the edge of your rails.
Another one I’ve been experimenting with
is this one where I basically turn my router sled into a table saw fence and it slides
along one rail with the guides and the other rail just supports it. This makes it so when you do different sizes
of boards you don't have to cut a brand new router sled that every time. I can take these 2 guides and I can move them
anywhere I want if my rails are 2 feet apart or if they’re 3 feet apart this will work
on that. The next thing you gotta think about in your
design is your rail edge. Now this is another crucial indexing feature. If you don't have this square if it's not
smooth then all of those variations will translate directly to the slab that you're trying to
smooth out. You wanna make sure that whatever you're using
for your rails is wide enough that it won't deflect when you lean on it or when there's
a router riding along it but at the same time it doesn't have to be a huge thick piece of
wood.
What I used on mine were 2 pieces of 1×4 MDF
trim. This trim is something I found in my garage
that I was gonna use to do some casing around the door but the edges are so square and so
perfectly flat along the entire length so I decided to make these my rails. Now with the rails, the critical thing is
this top edge. That's your indexing serface that indexes
with your router sled. For my set up here I just used some CA glue
and I glued some triangular blocks on to the back of this trim and then glued it down to
a piece of plywood. That way when I'm done I can break it all
down.
I may make it again or I may make a new one for the next time I need to mill down
a slab. A lot of people also spend a lot of time making
sure that everything glides really smoothly and that back and forth it’s just waxed
perfectly. and honestly I don't really see a huge need for
that. When you're routing this it's usually going
pretty slow; this is not a CNC machine that needs to be able to travel on an X&Y axis
seamlessly without any hiccups. This is just a router sled I go back and forth
like this, I slide it over to the next spot.

I go back and forth again, I slide it over and
it doesn’t really need to be smooth as butter you also need to make sure that your rails
are in the same plane. Now what that means is it doesn’t really matter if your rails
are going like this because your sled is gonna slide along the top of those either way but
what does matter is if they’re going like this.
Your router sled is gonna follow that same
contour another thing that really it really helps
when you’re flattening slabs with a routers sled is to make sure that you’re not taking
off too much at a time. Depending on the type of wood you’re using
and the power of your router you may need to take off less in each pass in order to
have a good surface finish. I’ve also found that if you cut in one direction
and then bring the router back over the same area again it helps to get a much more consistent
finish. What this also does is it makes it so that
you’re only cutting one direction with your router. The way that router bits work is if let's
say it they’re spinning this way and I bring the wood across like this the blades are coming
this way to cut, the wood is coming this way it'll make a nice clean cut.
Now if I go the other way, if the blade is
spinning this way and I bring wood from this side it's not gonna be as clean of a cut and
it tends to grab the wood and pull it and so you can tell when you're cutting the wrong
way because your router will start to jump… Woah this thing’s getting wild! T hat's when
you should probably cut the other direction now in my setup right here my router is spinning
in this direction that means that I want the wood to be going the opposite direction so
I'm gonna use this as my cutting stroke going up and then once I get to the other end, I
come straight back, smooth it all out and then I move my router sled up a little bit and
I cut the next pass.
When you do it that way you get much less
variation in the surface of your slab because it actually cuts a little bit different when
it’s going one way versus the other way. This one might seem obvious
but make sure that your slab is stable especially when you’re milling off the first surface
and neither surface is flat. You wanna make sure that the bottom surface
is shimmed in a way that it’s not going to move as you’re routing it.
For this slab I only had to shim one corner
a little bit to get up the other side was pretty stable. I would also suggest getting a large diameter
bit for milling. This one is a 2 inch diameter and has a half
inch shank and it makes things go much faster. one additional tip is if you can do this outside
because when you mill a slab like this there's a lot of chips that come off. My shop is covered so do yourself a favor
if you can and do it outside. I can’t do it outside cause I'm doing it
at night and I need to see. I also want to keep good relations with my
neighbors. If you do these things and you pay attention
to the indexing surfaces and make sure those are perfectly flat I promise you you will
save yourself so much time at the next step sanding and hand planing and finishing the
slab.
I hope this is helpful let me know in the
comments what tricks you have for milling slabs. now go build something see next time.