– How cool is it, we took a
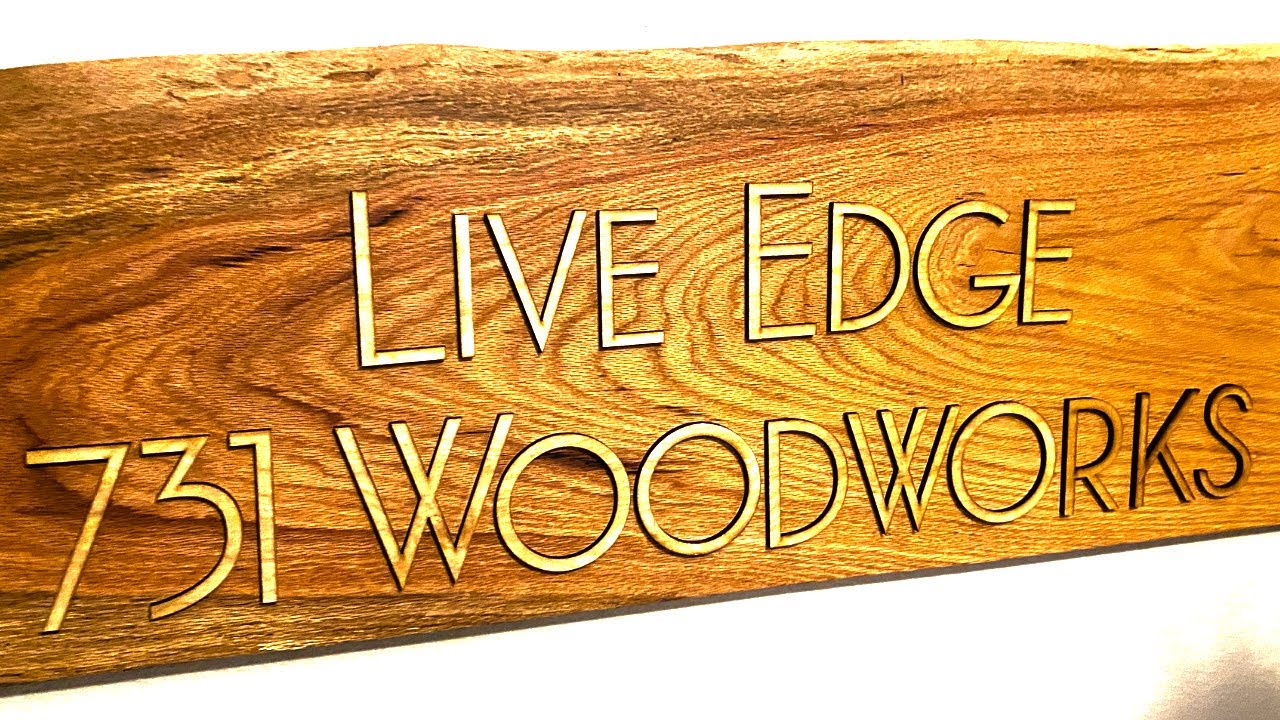
live edge piece of white oak and made a live edge sign out
of it, with a live edge on it. How are you doing? I'm
Matt with 731woodworks.com. Today, we're building a
custom live edge sign. You'll be seeing this sign behind us on the new show, "Live
Edge" every Tuesday night at 7:00 p.e. Central Time,
right here on YouTube. We hope you'll join us. So we took this white oak live edge slab. We ordered these custom letters from CarpenterFarmhouse on Etsy. We're not associated with
them, but they do good work and we've ordered several
lettering items from them. This font is called Waverly.
It looks really cool. Let me show you how we
put this thing together. So I bought these live edge
slabs, about nine of them.
They are 13, 14 feet
long, 17 or 18 inches wide by about an inch and a half thick. The only problem is they have a lot of cup and bows and stuff like that in them. We're going to make a live
edge sign, as you saw. And so the first thing I wanna do, I want to be able to run
this through my planer and keep it at about 12,
12 and a half inches wide. So the first thing I do, and we'll take this live edge bark off, and then we're going to
start working it down to get it nice, flat, and workable so that we can put those
live edge letters on there. We'll go ahead and ake
this bark off this edge. Should come off fairly easy. (energetic music) That should be plenty. We're only taking three
foot off this edge here and then we're going to leave the rest for something else later. I'm gonna take my circular saw, cut this across to make
it more manageable. So I know I want at least three foot.
So I'm gonna cut it a little long at 40 inches and go from there. Not really looking for square here. Trying to get it in a manageable size. (energetic music) (saw buzzing) Stuck! Get it down to thinner. (energetic music) (saw buzzing) Ah, destroying my camera. (wood rattling) So I'm gonna take off this excess bark. (energetic music) So this thing is terribly
bowed, twisted, cupped, I mean, you name it, this
thing's got it going on. I'm going to keep one side
that's the most live-edgiest, and then we'll rip the other side flat. And the reason I'm doing that, I need it to go through
the planer at 13 inches. 13-inch width is as wide as I can go. This thing is right at 13
inches, right here, 14. So it gets wider as it goes down. I hate to lose that
wide edge, one of them. I don't know any other
way of getting it flat. I don't have a flattening sled. If I had one of those with a router, that'd probably be ideal.
But for the most part, we just want one live edge
for the live edge sign. Let's do it. (saw buzzing) (energetic music) So I've got a piece of
plywood. This is 3/4 plywood. It's got a little strip
nailed on the end there. It's my flattening sled for my planer. It's not rocket science and
we're not building a clock here. We're building a wall sign. So basically, I'm going
to put this on here. It's got, this thing is awfully twisted. I'm going to shim this up on each side with some little pieces of wood. You get everything nice and stable before we start running
through the planer. Basically, all I'm trying to
do is make this side flat. And then once this side is flat,
or as flat as I can get it, I can flip that over and run
this side on the planer bed down with this other side up. I expect this to be significantly, significantly thinner
when I'm done with it because of what I'm making with it.
I want it to be flat so it
sits flat against the wall. I also want the other side to be flat so that the live edge letters will be flat against the board. Let's try it. Worst case
scenario, we're making firewood. (energetic music) I've got it fairly well shimmed up. The main thing is, you want to make sure nothing's rocking and moving.
There's not George, George. There's not large gaps underneath it so that when the planer
rollers are pushing down on it, it doesn't flex, especially, something as thick as
this won't flex that much. But the thinner you go, the
more flex you're gonna get. You just want to make sure
everything's nice and stable before you start running
it through the planer. I've got this board that
is nailed on the end here and it keeps everything from moving when it starts going through the planer. We'll start on the number two setting. That's the more coarse cut. Once we get to our final
thickness on both sides we'll do the number one setting. Makes everything nice and smooth. (energetic music) So I run it through there about, I don't know, about 20 times or so. It was a lot. So I'm gonna see how this worked out.
It's close. Happy day. Yeah, look at that. Flat! That's how you do it out there. See, I just used these shields here, just shims on this sled,
got her flat as it could be. Man, that worked out well. A couple of passes on this top side, and we'll have it flattened out. We'll be ready to start making our sign. (energetic music) So we milled this thing down from about an inch and a half thick, maybe a little over an
inch and a half, and now… It's about 5/8 of an inch thick, before we could get it flat. That's how bowed that thing was, how many twists and everything like that.
Is it perfectly flat? No, but we're not making a cutting board. We're not making a clock. It
don't have to be that precise. It is flat enough for a wall
sign. It's really, really flat. It's not perfect. There's about yea much difference, and it's probably because of my shimming. If I'd have took a little more time and shimmed it up a little better, I could have got a lot more flat, but I mean, it's really close. Now I'm wanna make it 36 inches long 'cause that's how long we want our sign. I got to consult with the boss, see which side she wants cut. Hey, baby, can you come out here? I just need your opinion, your expertise. So which end do you want cut off? Okay, cut this end? – [Woman] Mmhmm. – Love you. So she likes the look, the grain pattern and
everything on that end. I'm going to cut this
end off at 36 inches. I'm not looking for perfection here.

It's just going to be a rough estimate. One thing I do like about this Delta is that light line is so convenient. I didn't realize how much
convenient that would be and I use it all the time now. (saw buzzing) (energetic music) Save that for something else. I want to sand this down about 120 grit. We'll use these bench cookies. I've got a video on those. If you want to go check that out, I'll put it in the description below. Keeps that stock up off your work table and it keeps anything from moving while you're working on it.
I'm gonna sand this 120 grit, then we'll be ready to
start putting letters on. (energetic music) So we're gonna try to
glue on these letters with Titebond II. And we ordered these letters off of Etsy. I'll drop a link in the description below to the store that you can buy them from. They do different fonts, different, they can do any letter,
symbols, right, symbols, various letters and symbols
and different fonts.
You can go check them out. We've ordered several items from them. They always ship fast,
they always do well. They don't know us, we don't know them, we just order from them. Go check them out. We're going to try to glue
this on there, Mrs. 731 is. (energetic music) So now we're just gonna put
the finishing touches on. I'm using this Odie's Oil. I'll drop the link description below if you're interested in checking this out.
I used that on my mallet build video. If you haven't seen that,
you can go check it out. This stuff is really nice. It really brings out
the natural wood grain of the wood that you're using. It's just a nice, natural finish. Put it on there about 45
minutes and then wipe it off. Don't leave it on more than 45 minutes. It's hard to get off after that. This stuff's really nice. Got
a good citrus-y smell to it. I actually like the smell of this. And then we'll wipe it
on real, fairly generous. And the only thing that concerns me is getting around in
the nooks and crannies. I'm probably just going to use a Q-tip, kind of get in there. We'll let it sit 45 minutes,
then we'll buff it off and then we'll put some
D-ring hangers on the back and we'll be ready to hang this dude up.
My only concern is I hope
that we put enough wood glue on these letters to hold them on. If not, they're fixing to
come off and we start oiling because we'll be bumping
them around and stuff. (energetic music) If you're not able to
join live on "Live Edge", the show's always available right here on YouTube for replay. We're also on most all
podcast distributors, Google podcasts, Apple podcasts, Spotify, those kinds of things. Just look for "Live
Edge" with 731 Woodworks. Or we'll drop a link description
below to the podcast. If you're not a channel member and you would consider doing that, there's a join button right
below the desktop here.
If you're on mobile, there's
a link in the description. – [Woman] Yeah, there's a
link in the description. – Hitting that join button
supports this channel directly, and we greatly appreciate that. Being a channel member gets you access to cool perks like discounts,
behind the scenes footage. You also get some custom emojis and icons by your name when you comment or if you participate in the live chat. So we hope you will consider
supporting this channel. Hey, thank you for watching. If you click that box right there, it takes you to the next set of videos. If you click that box, you're getting that big
old virtual fist bump. Also, if you haven't subscribed yet, we'd greatly appreciate if
you hit that subscribe button, hit that thumbs up, share
it on your social media.
We appreciate all that you do for us. Thank you for the support..

