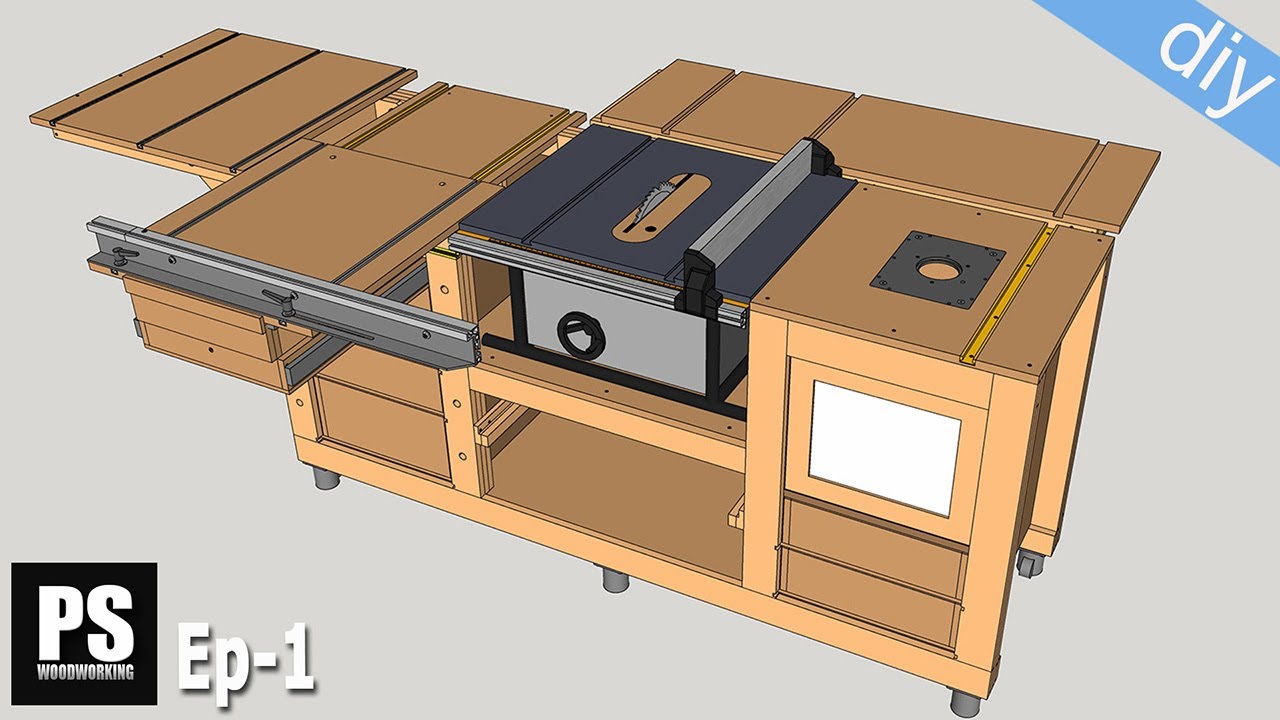
This is the first video i n a five-part series
where I'll show you how to build a robust and versatile woodworking bench to which I'll
also attach my new bench table saw and a router table. This is the 3D SketchUp file included in the
plans, available on my website. As you can see in the animation, I'm going
to install two folding tables to save space when I'm not using my bench, as well as to
have more space to work when necessary. I'll also make a sliding carriage for more
ac-curate and comfortable crosscuts. I'll start off by showing you how to build
the frame. First, we'll make the four outer legs. I've cut a piece of wood, which I'll use to
space the pieces evenly.
I apply glue on the wood and use nails to
secure the pieces. I clamp two legs at a time. Don't forget the legs must be symmetrical. Now I'll move onto the four inner legs. I follow the same steps as when I built the
outer legs to make tenons and mortises, but these are a little different. In order to make the assembly process easier,
I ordered cut-to-size frame pieces and cabinets in the same place where I bought the board. If you want to do this project and you already
have a bench saw, you can cut them yourself at home. Now, in much the same way, I'll make two mid
rails. They're a little bit easier. Next, I'll make the two top rails on the right
side, where the router will go.
As you may have noticed, from the beginning
I've been marking the spots where I'll put glue on the pieces. Now, I'll make the top rail for the left side,
where I'll place the sliding carriage. And now, the back rail. These two are a little different. Lastly, I'll make two long bottom rails. First I'll make sure all the pieces are the
right size. I'm going to need a few clamps to apply pressure
evenly.
I'll run some tests to see how good the mortise
and tenon joints are, and they seem to be perfect. With a hand plane, I correct the inner rebate
of some of the legs which needed it. In order to assemble the frame, I need to
drill some holes in the legs. Some 20mm diameter holes for the holdfast
clamps. And some more holes for the folding table
axis on the left side. Now I can start putting together the parts
that make up the frame. I'll do this bit by bit, joining one of the
long bottom rails with the two legs and the short top rail. I put low pressure on the clamps, and finish tightening them little by little once they're
all in place and after making sure they're square. Once the glue is dry, I turn the frame to
glue the mid rail on. First I drill some holes for some dowels that
will strengthen the bond. I'll sand down the inner side of the frame,
now that it's more convenient.

Now onto the inner cabinets. First of all, I'll make sure the pieces are
proper size by inserting them into the frame rebates. With the table saw, in several runs, I make
channels for the drawers to slide on. I'll definitely need a dado blade for these
cuts. In the SketchUp design, I joined the cabinets
with screws. This works fine, but in my case, I'll use
some biscuits. I apply glue and clamp them together. Now I'll follow the same steps with the router
cabinet. In the cabinet, the top piece is lower, at
medium height, more or less.
Before putting this cabinet together, I cut
a notch on the outer side so that I can later add a power switch. And now comes my favorite part–joining the
modules with the frames. Before using glue, I make sure the cabinets
fit into the rebates. I apply glue, insert the cabinet and put pressure
with clamps. I follow the same steps with the second module. Once the glue is dry, I can glue the second
frame part on. This time I have to glue on two modules at
the same time. I'll need all my clamps for this step. Before moving on, I'll fasten these small
pieces with glue until that part is thick enough to later attach the wheels with screws.
I'll also glue another a piece like this one
in the middle of the bottom of the frame. Once the glue is dry, I smooth down all the
frame joints with a hand plane. With a saw and a chisel, I make channels for
the drawers in the front of the frame. Once I'm done, I'll screw the wheels to the
bench, I only have four wheels in the shop. I'll add the two middle ones later on if necessary. and also some metal plates to reinforce the bottom shelf. I turn the bench and check how firm and stout
it's going to be! Now I make some recesses to the central
shelf, where I will be placing the bench table saw. I make sure everything's as it should be and
see if I can use the saw fence. Now is also a good time to finish the electrical
installation. It's quite simple. I'll use a power strip and an emergency paddle
switch. I fasten a junction box with screws to protect
the back of the switch, as well as an outlet for the router.
After screwing a power strip to the bench
and checking al the connections, I make sure everything's working correctly. That's all for today. In a few days I'll upload the second video, where I'll be showing you how to make a sliding carriage..

