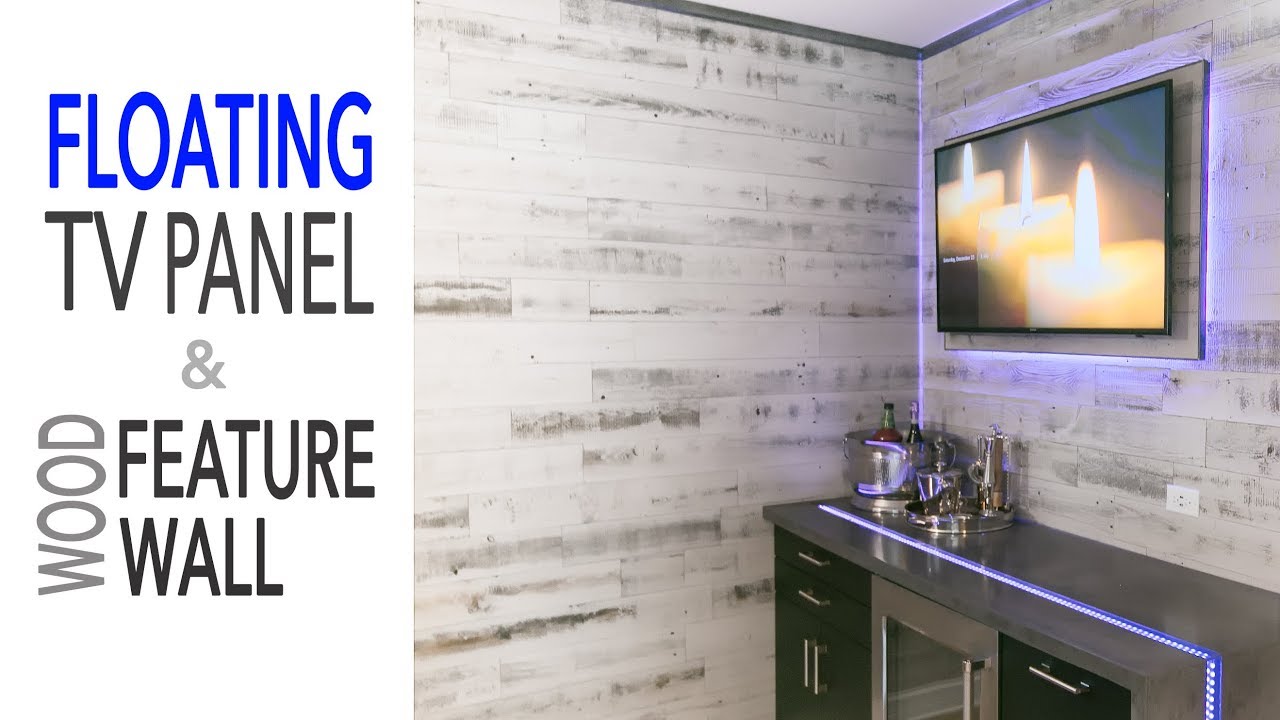
What's up makers? Welcome to the second and final installment in the mancave makeover over at my buddy Al's house. In the first part we made a concrete waterfall countertop with an embedded river of
LEDs that cascaded over the edge. If you haven't checked that out make sure to do
so after you watch this one – the link is in the video description below. In this
second part we make a TV feature wall and install IKEA cabinets and a built-in fridge under the concrete counter. Before
we go into detailed steps of the cabinets and the TV wall, I want to give
you a quick overview of the project. One of the highlights is the TV panel that
appears to float because of the LEDs illuminating it from behind. The floating
TV panel is made from a plywood back frame, which is attached to the studs and
has LED strips wrapped around it. We then add a plywood top panel, which serves as
a mounting surface for the TV and hides the LEDs.
These two panels have
overlapping cutouts that allow the TV wires to be hidden in the wall. We cover
the wall and TV panel with a material called "Stikwood" which we'll get to
later in more detail. To simplify things we decided to use Ikea Sektion line of
kitchen cabinets, and we added an under counter beverage center to round off the
mancave. We then installed the waterfall concrete countertop ,as I detailed in my
last video. After installing some aluminum trim on the TV panel, we
installed the TV with a TV mount. After cutting the back frame for the TV panel from 3/4 inch plywood, I drilled countersink holes in it for the screws
that would attach it to the studs because we need the top frame to sit flush against the back frame. Next we went to install the aluminum tile trim that would give us a nice edge on either side of the wood feature wall. I'm just using outdoor double-sided
carpet tape to install the tile trim. Both the tile trim and the double-sided
carpet tape are available at your local Home Depot.
So, for the walls, we used a
product called Stikwood, which I really like. It literally is peel and stick wood.
It's a little on the expensive side, but it's so quick to install, which saves a lot of
time and labor; and time is money. To install the Stikwood, all you do is
measure the length you need, take it to a miter saw and cut it, or cut it with a
circular saw and a speed square, and then peel off the adhesive on the back — which
is 3M VHB tape — and apply it to the wall. For the cabinets, we decided to make our
lives a little bit easier and buy IKEA cabinets. For our cabinet fronts, there's
a new line that's a gunmetal matte black, which looks really cool.
It's called the Kungsbacka line.
This is actually my first time using IKEA
Sektion kitchen cabinets and I thought they were really nice. The Blum hardware,
they come with is very high end. It's got nice, soft-close drawers, and I really
liked him. I had to remove the pre-existing baseboards so that we could
install the cabinet's flush against the walls. Having an oscillating saw made
this a little bit easier, but it's totally doable with just a crowbar and
rubber mallet. I won't go into a lot of details about the cabinet installation
because IKEA cabinets do come with instructions. Generally, the process
involves installing a long hanging piece which extends the length of all your
cabinets and screws into the studs.
Then you hang the cabinets from this piece. That way once you make sure the hanging piece is level, all your cabinets will be
level and even with each other. Then we installed the refrigerator and cabinet carcasses. I want to mention that
it was a mistake to install the cabinets right now. We ended up uninstalling them so that we had room to access and finish
installing the TV panel, and then reinstalling them later.
Before installing the front frame on the TV panel, we wrapped the LED strips
around the back frame. And I just used the adhesive tape on the back of the strips adhere it. There's a link to these 30 LED per meter ws2812 LED strips in the video description.
Then it was on to make the front frame for the TV panel. I cut a hole out of
this that matched up with the hole in the back panel, so that we could run the
wires through the wall.

We set up the laser level again to mark the exact
position of the front frame, and then screwed the front frame to the back frame
to complete the structure of the TV panel. With this arrangement the LED
strips are hidden so you don't get the spotty LED look, and just get a nice glow.
For the front of the frame, we use the same Stikwood material
that we did on the walls, so it really kind of blends in. It's just a subtle
floating effect. While we're installing the Stikwood, I wanted to take a moment
and remind you that if you like my videos please click the little red
subscribe button below, and also click the thumbs up button to let YouTube know
that you like it, so they can recommend it to other people.
And one last thing to
mention about Stikwood is you're going to use a J-roller to release
the chemical in the tape, so it really adheres to the surface it's on. After
reinstalling the cabinets, it was time to install the waterfall concrete
countertop that we built in part 1 of this mancave makeover series. And, on the
sides of the frame we use some fairly inexpensive aluminum trim that we
ordered from Home Depot.
We spray-painted it with a rust-oleum
metallic hammered finish which gives it this really cool hammered look, almost
like it's a pin driven into a piece of steel to give it some texture. I am a big fan
of this product — I'll have a link in the video description below. We use the
double-sided carpet tape again to attach this aluminum trim. I've found this tape is just
a really handy thing to have lying around. While we're installing the TV mount and
the TV, I wanted to mention the reason you haven't seen me discuss the
electrical behind the TV. We hired an electrician to do this,
and it's something I definitely recommend you hire a professional for
unless you really know what you're doing.
And that's it for the mancave makeover.
This was a fun project — it's my first remodeling project. So leave me a comment and let
me know if you want to see more of these or if you don't want to see more of
these. And, as always, if you like this video, please subscribe to get notified about
future videos, and click that thumbs up button to let YouTube know you like it,
because that really helps me out. Thanks, and I'll see you next time.

