– Hello and welcome, name's Angie Holden. And I'm the blogger behind
The Country Chic Cottage. So today, I'm gonna use my Cricut Joy, for a very special project. Now, this video is sponsored by Cricut, overall projects and opinions are my own. So what are we gonna do today? Today, we're gonna use our Cricut Joy, along with some Smart Vinyl,
as well as some Transfer Tape to make stencils for wood burning. So I'm gonna make some
gifts for Father's Day. But you can use these same techniques for tons of wood burning projects. So I'm actually gonna do
several different experiments. Here are a few of those right here. And you can see that you can wood burn on a variety of surfaces, all with a stencil and
your Cricut machine.
So, first of all, let's dive in to the supplies you're gonna need. And I do encourage you,
watch the full video, because I do have some tips and tricks for the types of wood that will work best, what will and will not work. Because I like to test all the
things so you don't have to. So let's dive in. All right, supplies you're
gonna need are as follows. So I'm gonna use my Cricut
Joy along with Smart Vinyl, and Transfer Tape to make stencils.
And then you're gonna
need some grill tools, or cutting boards. I'm gonna do a variety
of things as examples. So what you wanna look for is something that is unfinished wood, or something that's light like this that just has like a thin coating on it that you can take off with some sandpaper, which I have over here. The sandpaper, I would recommend like 400, 600-grit sandpaper,
somewhere in that range. So what you don't want is
tools that look like this because these are finished handles. And the method we're gonna use for this will not work on these. And then we're gonna need our
EasyPress Mat, weeding tools, a scraper, heat-resistant
gloves and a heat gun. And you're gonna need a heat
gun that gets really hot. So this one goes up to like 1,000 degrees.
It's gonna need to get really warm because we're gonna use something called a Scorch Marker
for our wood burning. So they make markers, as
well as there's companies that make pastes that go into stencils. I like the marker, personally. And we're gonna use this to
put a coating on the wood that will then become wood burned once we apply heat with our heat gun. So let's start by taking a
look in Cricut Design Space at how we're gonna design the stencils. And you can make these
whatever size you want. I'm gonna approximate a size, and then cut some stencils
with my Cricut Joy first. And then we'll look at
wood burning our tools. All right, so I'm in Cricut Design Space, and I have my Cricut Joy
chosen as my machine. And now, it's time to make our sayings. So I'm gonna leave the
link for this canvas in the description below. You can definitely use mine. But I did wanna go over
how to design your own.
So the font I'm using is
called Cachet Pro Heavy. It is a Cricut font. And you can pull up mine, or you can pull up your
own and just type the text. So I found that a font size of 35 worked best sizewise
for the tools I'm using. So what I did is punch
in various font sizes, and look at how tall the words would get. So when you're dealing with something, like if you wanna put barbecue,
the Q goes below the letter, so it's gonna be a little taller. Then, we're gonna add rectangles. So all we're gonna do to add a rectangle is go to Shapes and go to Square. And then once you get that square, you just unlock the square to
pull it to a different size.
And I'm gonna make all my squares .75. So I unlocked it and I typed .75 in here. Now, I can make the width whatever I want. And change my height
back to .75 at any point. And this is how we're
gonna make our stencils. So what we're gonna do is make a box for each one of these we wanna use.
Now, I don't have enough
tools to use all of these, but I wanted just to get a wide variety of examples of sayings that you could put on
the handles of tools. So what we would do is put
the word over the rectangle. And I'm actually gonna
copy that rectangle, and duplicate and move it down
here so we have a second one. Then, click these both. And after I have those both picked, I like to do a line and then center to make sure it's in the center.
And then attach those together. Now, the word, Number One Dad will cut out of that rectangle. So now, we just need to
repeat for the others. And we can make these
any color we would like. Let's make them white
so we can see better. So now, you can see better
what it looks like cut out. So now, for each of these, so when I add a new rectangle, I'm gonna go ahead and copy this. When I add one, I will need to arrange, and then click Send to Back. And that will make sure
my Grillmaster's on top. And I can see that the
Grillmaster is like 4.426, so I'm gonna make this about five.
And we wanna make sure the
Unlock button is chosen. So five by the .75 will work great. And then put the two together. Choose them both, Align,
Align Center, Attach. So now, I'm just gonna repeat that same process for
each of these sayings, so that I have enough to
make all my grill tools. So what I would do is
choose the sayings I wanted for however many grill tools I have. And then I would delete the
ones off that I don't need, and only cut the ones I needed. So for an example, I'm gonna
go ahead and make all of these, and save this project
so you will have them. But you will just need to cut the ones that you need
for your grill tools. So I'm gonna continue with this project, and then we'll come
back, click that Make It, and cut these with our Joy. And the last one here, I did
wanna show you one thing. So if I pick these two
and do the Align Center, you just wanna make sure that because this Q hangs below here that it actually leaves
enough room top and bottom.
I think this is enough room. But if you feel more comfortable with more room around your stencil, feel free to increase the
size of your rectangle, or manually move your
lettering or square around. So now, we'll choose
them both, click Attach, and we are ready to click Make It. Now, for the Smart Vinyl, we are going to click Without the Mat. So we do not need the mat
to cut the Smart Vinyl. And we'll click Done. And then it's gonna tell us
how much material we need. So we need 15.25 inches to make this. So what I like to do is look and see if I can move these around, and cut off a little bit
of the required inches. So I think I can move these both up. And now, I should only
need about 13 inches.
Yeah, so 13.75 inches. So that I always try to look and see if I can cut a little bit off my length. I don't think I can do a whole lot else to cut off the length but
I could at least do that. And I am gonna cut all these for illustration purposes once again. But you only have to cut the ones that you are going to
make for your grill tools. So I'm gonna go ahead and
we'll head to the Cricut Joy, and we'll cut our designs. All right, so I actually have my project pulled up on my phone. And I've chosen Smart Vinyl
Removable as my material. And then you can start just feeding the Smart Vinyl into the Cricut Joy. It will measure it for you. Make sure you have enough material. And it'll prompt you to start
cutting when it's ready.
So when it's ready to cut,
it'll just ask you to tap Go. Now, this is on mobile or on desktop. I just have my phone here, but it will do the same thing on desktop. The Cricut Joy is super
simple with just one blade. So as long as the blade is installed, we do have the correct blade, and we'll just click Go to start. Then, once your cut's
complete, just press Unload. And now, we can weed our stencils. All right, so now that our vinyl's cut, we'll just wanna weed away everything. So this will be a stencil. So in this case, I want an
outer box around the outer edge, like we made in Design Space.

And then I want to leave all those, like the middles of that R. So I'm just gonna continue
weeding this design. And then we're gonna add this one, this is a grill cleaning
tool and it is raw wood. So I am gonna sand it just a little bit. But let me weed this first, and then we'll talk about the
application of the stencil. All right, so now that the
stencil has been weeded, let's just take a really
fine grit sandpaper. So this one is like a 600. And I'm gonna decide
where I want this to go. So I think I'll put it down on this end. And then just where
the stencil's gonna go, let's just make sure the
wood is nice and smooth. So we're going to super fine grit, and just make sure we've
smoothed that wood out. And then we just wanna make
sure that area's clean, so our stencils stick.
You could even use a tack cloth if you felt like you got a lot
of sawdust, which I did not. And then we'll just use a
small piece of Transfer Tape and put that directly over our stencil. Now, here's where that scraper comes in. We're gonna use that, burnish it down really
well, front and back. Now, if you have trouble
with the Smart Vinyl, as far as getting it to
stick to the Transfer Tape, what you can do is hit the back of this with just a hair dryer and a lot of times, that will help that vinyl
release from this backing paper. I think I'm just gonna
attempt to lift it up. All right, so there's our
stencil, all on our Transfer Tape. And now, we just wanna apply
it right here where we sanded. We just wanna make sure
we get it straight. And then we're gonna
burnish it down really well. And just peel that Transfer Tape back. And then I like to save this Transfer Tape because we can definitely reuse that for the rest of our stencils, so I'm gonna put that
back on the backing paper.
And then I'm gonna go
over this several times, pushing everything down really well. Making sure it's adhered to the surface. There aren't any air
bubbles, that type of thing. And I like to kinda go in all directions, just to make sure everything's pushed out. And then it's time to use the marker. So on the marker, there's two ends. There's a brush end and a tip end. I'm gonna use the tip end. And what you wanna do is get it started on a paper towel or a rag. Do not start it on top of your blank. So we're moving the blank out of the way. And we're just gonna push down, and make sure that the liquid is flowing. And the liquid is a pink color, so we're just gonna make
sure that it's flowing out. And I mean, a little bit
goes a long way on this. So as long as it's flowing, you're good. And then you can just
color in your stencil like it's as easy as
coloring with a marker. And you should see it be
sort of pink on your surface.
And you just wanna color
inside the entire stencil. And just kind of watch that
wood turn a pinkish color. And we're gonna repeat this
for the entire stencil. And then the key to this is
gonna be to let this dry. So I'm gonna let this dry completely before I remove the stencil. So, then the other thing
I want you to watch, so I pushed down on that rag,
I'm not pushing down here. I'm just rubbing it across the surface. And enough ink is coming
out that it's fine. So you never wanna push down on the marker while it's on your surface. Just push down on your rag. So if I felt like this
wasn't coming out enough, I would go back to my rag and push down. I would not push down on
the surface over here. So we're just gonna
continue and fill this in. Allow this to dry and
then we'll come back, and do the magic portion of
this, which is the wood burning. All right, I like to put my
project on my EasyPress Mat, just to protect the work
surface wherever I'm at from all the heat I'm about to apply.
And now that I'm removing this, hopefully you can see how
the wood has turned pink wherever I applied that marker. So that means that this solution
has soaked into the wood. And that portion will wood
burn when I apply the heat. So we just wanna remove all the vinyl, even those centers of the letters. And now, hopefully you can
see the word on the project. All right, for safety during this portion, I like to wear my heat-resistant gloves. I'm going to use my heat gun. I'm gonna turn it up really
high, high as it'll go, and I'm just gonna run over this. So I am going to turn the sound off because the heat gun is pretty loud. And I'm just gonna do a
voiceover for this portion. And I do wanna note that the
video will probably be sped up, so you can expect your project
to take a little bit longer.
So let's get started burning some wood. So you wanna turn your heat
gun on as high as possible. Keep it two, three inches
away from your surface, and keep it moving at all times. And I did speed this video up. But the entire process took between two and a half to three minutes. So it's really not a long process. Then, you'll start to notice that your area will start to change color. Again, just keep it moving. Move it back and forth. It will gradually change color. You can stop at any point. Stop when you love the
look of your wood burning. And that's it. And there you have it. So you can turn it off at
any portion of the process. I really like the way
this looks right now, so I'm gonna leave it like that. So what I did wanna say is
you do need to go over the top with a sealer on this wood burning. So if this is going to touch food, so this is a grill cleaning tool. It's not gonna touch food, I can use any sealer
I wanted over the top.
If it's going to touch food, however, you would wanna make sure that it's a food-safe sealer
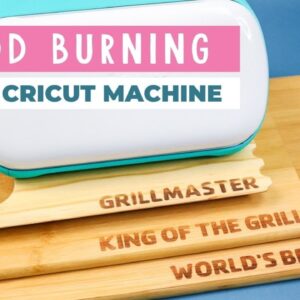
that goes over the top. Let's take a look at some more examples of wood burning with your Cricut. Here's the first project we did, and I went ahead and did
some more cutting boards. So there's one that
says King of the Grill. Here's one that says World's Best Chef. I did have the best luck with these going over the stencil twice, allowing it to dry and
then pulling it off. This was what happened if
I only went over it once. I feel like I didn't
get really good coverage on all the areas. And it just may be the way
I was using the marker. But I think for best results, I would probably go over it twice, allow it to dry completely, remove the stencil and then wood burn. So I think for me, that's the best option.
And then I wanted to do
a few more experiments. So for this one, I went super
small and it did wood burn. However, it was hard not to hold. Because it's so small, you can't hold the gun in one
place too long or it burns. And you can see there's a burnt place on my tool on the side.
So that's the only problem with
doing something super small is that you do run the risk
of getting those burn spots. And that is what happens. It would even happen on the cutting board if I held my heat gun
in one place too long. So just to note that. And then what would happen if
I did it on a rounded surface? So this is on a rounded surface.
It did work. However, I think it's just this wood, it started to kind of change
color around the area. And I think it's just the
wood it's made out of. So bottom line is you can wood burn with your Cricut machine. However, I had best
luck with going over it twice with the Scorch Marker. Going really small doesn't work too well. And certain woods or finishes
will ruin the effect. But wood burning with your
Cricut is completely possible.
All right, so now that we have
these projects wood burned, we do need to seal them. And like I said, on like
something like this, you could use any sealer. On the cutting boards, I would use something that is food-safe. Then, once you seal
them, that sealer dries, then all that's left to do is to pop them into a
cute gift basket for dad. So I've included some
grilling tools in the basket, and then put the rest of your little wood burned projects in there. And you are ready to give a
cute gift for Father's Day with a little personalized touch. So remember, we did this wood
burning with our Cricut Joy. So you can put any
saying you want on there, so make it personal to dad. You could even put like
his name, last name, his last name and kitchen
or first name and kitchen. You can make it completely personalized because you handmade the gift yourself. So I hope you enjoyed learning how to wood burn with your Cricut machine.
If you have any questions
about anything we've covered, drop down in the comment
section and ask away. If you liked this video, if it helped you, give us a thumbs up. If you haven't already, head
on over to our YouTube channel, hit that Subscribe button. We have Cricut videos
every week and trust me, you don't wanna miss any of those. So thank y'all so much
for joining me today, and I'll see you next week, bye-bye..