
– How you doin'? We're workin' today. I'm gonna learn how to use epoxy. I've never used it before. This may be an epic fail. (knife clatters) Let's find out. So TotalBoat reached out to me wanting to know if I
wanted to try some epoxy. They would send me an example. I's thought, why not? So they sent me a little swag bag. Country Boy, gotta get that, gotta get that hat shape. This is not a sponsored video. They have no idea I'm even doing this. I thought, I've never used epoxy. So (claps), why not learn on camera? So how many of you
remember the mallet build? I embedded that Ten
Commandments coin on both sides. Now, if you haven't seen that video, go check it out. It's pretty interesting. I'm really proud of how these come out. (box opens) Tabletop epoxy, got some instructions. That's good, 'cause I'm
probably gonna need 'em. So we got clear resin, part A, and the hardener, part B.
It says, "one-to-one mixed ratio," so I know that this
stuff is supposed to be at a certain temperature so that it cures correctly, especially the deeper pours. If you've ever went and
watched John Malecki, he has a ton of epoxy videos, and that's where I've
done most of my studying for the last day or two. Yes, I do love my wife, she's awesome. So this is my first time
using any kind of epoxy. So if you do see me screwing up, just yell it at the screen. I'll probably hear it. And if I don't, you can just comment below that I'm screwin' up royally. Move that heater back. Toastin' the old buns. So a one-to-one ratio. If we do four ounces, I can do two of part A, two of part B. This is part A. It's thick, like snot.
That ain't gonna, how's that gonna filter? That's not gonna filter, is it? Is this stuff too cold? I probably shoulda had
this stored indoors. Ew, that stinks. Oh, this is much thinner, much thinner. I can see already, I probably shoulda measured better. Hey Siri, two-minute timer. – [Siri] Okay. – This just looks kind of milky. How are you supposed to pour it if it's that thick? So this is really milky. I'm actually a little concerned to just slop it on that coin.
So I made a, made a test hole. I think I mixed it
wrong, or it's too cold. Feel like this is an epic fail, maybe not epic since I didn't, See, I think it's supposed
to be a lot thinner. Is it not mixed well enough? I don't know, so that's our test piece. We'll have to let that dry a little bit. Yeah, this is gonna be
harder than I thought. I think this is gonna turn out too milky because it was too cold
when I first mixed it. Let's try again. I just wanna try it again, all right? So I warmed this up and
it is much thinner now. So I think it was just too cold earlier. And I wanna make sure I get
the ratios right this time. Just a dab'll do me, right there. So that's two ounces of part A, two ounces of part B. Hey Siri, two-minute timer. – [Siri] Pay attention. – So it says to mix
for one to two minutes, and then transfer to another container.
I'm not real sure why, but
that's what we're doing. Then you let it sit for one to two minutes in that container, to
allow the air bubbles to rise to the surface. No wait, "Transfer to second container for one to two minutes again." This time it looks a lot more clear, but it still has a cloudy look to it, 'cause our original pour is really milky. But there's quite a bit of difference in the way that looked,
versus the way this looks. All right, so I've let it sit for about two minutes inside this cup. It looks much better. Still not really clear. I'm a little nervous, here goes. Should I even do (laughs), should I do this, y'all? Oh man, mm.
If it, if it works, it's gonna be awesome. But if it don't, oh my goodness, epic fail. I did get the temperature up to 65, ah, here we go, 65 degrees in here. So the temperature is much, much better. Of course I'll have, Oh no no no no no. Oh, can I even wipe that? Should I even mess with it? What should I do folks? I overfilled it, y'all. We're gonna let that sit 10 minutes, then use that heat gun, but it looks like it's
gonna be really clear if the bubbles come out, if the bubbles come out. So I've got this old Wagner, Wagner, this old Wagner heat gun. Ready?
(heat gun hums) Just kinda make ya nervous. I immediately saw a bunch of bubbles either come out or something. Hey, y'all, let me tell ya.
It's clear, it's like perfectly clear. When I hit it with that heat gun, all of those bubbles went whoop, and come right out. Man, that's pretty cool. The only concern I have now is it is flooded outside of my pour area, which I was actually a little concerned it was gonna do anyway. I gotta do a little research on how to sand that and keep it clear. I'm, I think I can do it. I think I saw someone do a clear and sand it back flush, and then was able to get that clear back. I think I can. So we're gonna let that
dry for a few hours, four hours tack-free, and then once it is not tacky, I will flip it over and do the other side, which means I'll have
to make up another pour.
This is looking good. So five-hour update on
this first epoxy project, (mallet taps) 'cause it's still kinda
gooey and like, honey, 'bout the, you like honey? I love honey. It's (laughs) like the
consistency of honey. So, I'm hoping that
(mallet taps) I can do this and knock that air bubble out. But so far, what do you guys think? It's pretty clear. The original one I mixed up that I didn't get
completely mixed one-to-one, it was more like one-and-a-quarter
to one or something. It's not clear. You see that it's actually kinda foggy. So that's something to keep in mind. It is also tacky. (light contemporary music) Like that. Oh, too much, too much, too much. So I've been told I need
a very high-grit sandpaper to polish it back out. And I don't have any, other than this sanding block paper.
So I'm gonna (laughs), I'm gonna try to attempt to make some. We'll see how this goes. This is just a old piece. I'm gonna throw some
CA glue on this thing, and I'm gonna try to make my
own (laughs), my own paper. What do you guys think? Is this gonna work (laughs)? I don't think so. (pump spritzes) But I'm gonna try. We'll let that dry. I have no idea, that might not even work. We'll let that dry while
we start sanding this with a lower-grit paper. Man, I'm nervous about this, 'cause it looks so good.
I'm scared I'm gonna mess it up. Ah, it's probably gonna be a disaster. Did it stick, it stuck (laughs). So this, it may work. It may work. Ye ole bench cookies,
throw those under there. They give me something
solid to set that on while I start sanding (whines). A little nervous, who else is nervous? 'Cause I know it's gonna
fog over when I start. (sander buzzes)
(light contemporary music) Borrowed the mask.
I don't wanna sand this
epoxy without a mask. I did 60-grit, and then 120-grit. And now I'm gonna do 220 before I try to polish it
up with that 3,000-grit. It sanded smooth and a
lot easier than I thought. (sander buzzes) So you can see, and I'm gonna get you a little video right here. You can see that little
bit of imperfection there. That's where it's dipped in. I didn't get enough epoxy in there, so it's really better to, so far that I've found, to overfill than it is to underfill. But you can see that it's still foggy, and that's after doing
60-grit, 120, and then 220.
And now I'm going to try my
homemade piece of 3,000-grit. (light contemporary music)
(sander buzzes) – Hm, so it's still just a tiny bit foggy. And I think that's because I skipped quite a bit of grit, when I'm sanding. Brought a little cup
of water out here, try. (sander buzzes) All right, so I've got
some 400-grit paper. It's actually SandNet,
that Diablo SandNet, that's 400-grit.
I'm gonna try that, and
then jump to the 1,000-grit. (sander buzzes) Couple things I just learned. Y'all, it's, (laughs) look. It's starting to come back, and the key ingredient is, properly step through the sanding grits, because when you do that, it's eliminating those course scratches and makin' 'em finer and finer and finer, until it's polished, right? And so I'm, I went back and
found a 400-grit sandpaper. Now I'm gonna do the 1,000-grit, 3,000-grit, that's all I got. And so if, if I was doing this again, I would get me some sandpaper in steps all the way up to 1,000 or 1,500-grit, and then the final polish at 3,000-grit, with a wet sand.
But so far, I like what I see so far. And so I'm hoping that this final sand will make everything clear. Let's find out. (sander buzzes) So I'm gonna have to do a
little more research but, when you put water on it, she's clear as, she's crystal clear. And when you don't, it
has a little haze on it. I mean, it's smooth, very smooth. That one imperfection on
the bottom where that, I think it was an air bubble
come out, is what happened. Pretty cool project, though. According to my vast research on Google, I need polishing compound to
get that back where it goes, and I don't have any.
But I do have some Blue
Magic metal polish. I know you're thinkin', metal? But it says plexiglass and fiberglass. This is close to that, right? In case y'all don't know, this does awesome for
polishing up your brass, if you wear uniforms, with metal buttons. I would assume it would
need a high speed, vroom. So I'm gonna, terry cloth (laughs) on the, whatever this is, on the sander. (sander buzzes) Woo wee, ha. Hey, y'all ain't gotta call me a genius, but (laughs), that worked. Hoo, that's crystal clear too, man. That looks good, ooh. I'm actually really shocked that this come out as well as it has. Course, I still got to put
that Odie's Oil on there to finish it up, to get
that color back in the wood. But man, I mean, I'm gonna flip it.
Look, that's the one side
that's been polished, and this is the side that
has not been polished yet. So you see, there's a clear difference in that fogginess, versus the clearness. A Blue Magic, disregard
the rag on here trick. Doesn't work if it's got
strings hanging off of it. So I just got a blop of
that Blue Magic on there.
I really wanna use my sander again, So I'm gonna have to figure something out. Good news, sander's not needed. Woo wee, they look good, man. Hey y'all, hm. Jeez, that is really, really cool. I hate that that bubble
come in there on that one. Obviously on pour one,
the first pour I did, I don't think it was
mixed exactly one-to-one. I think it was more like 1.25-to-one. And so I did get some
very, very fine air bubbles down in the epoxy. And you can see that, on this side here with the cross. And on the other side
with the Ten Commandments, you can see that it's much more clear. And that was my second pour. I learned a lot between the first two. So mix it properly, mix it properly, mix it properly. Also, I took it inside after it was outside for a little bit, and it was about 60 degrees in the shop. I took it inside, where it was about 72, and that helped it cure a lot better. And so on the second pour, I poured it inside, did I pour it? No, I poured it outside, and then I just took it immediately inside and let it cure.
So having that right
temperature and the right mix is very, very, very important. But now I'm gonna use this Odie's Oil, just like I did on the mallet build video. Some really good stuff. It lasts a very long time. I've already used, I've only used about a,
not even a half of it, and I've used it on a ton of projects. So a little bit of this goes a very, a very long way.
You just put it on with a terry cloth, and you just dab it on there. And so you just start putting it on, and then 45 minutes, no more than 45 minutes later, we'll come back and we'll wipe it off. And being that it's just an oil, it should not affect the
finish of that epoxy, at all. If anything, it should give
it a more glossier shine. I'm actually very happy
with how this turned out. Man, it look good (laughs). Oh I like it, I like it a lot. So while the Odie's is curing, before I buff that off and
show you the final product, let me tell you what I
learned about using epoxy. TotalBoat did not put these
instructions in there, as a suggestion (laughs).
You gotta follow those things to the T, 'cause if you don't, it
don't come out right. It's just the way it is. You see that test pour I
made on the little hole. I just drilled a hole
and poured it in there. That was not mixed right, at all. I just kinda winged it. Didn't even really use
their measurement guide, the one-to-one, and it
come out extremely foggy. So on the second pour, the actual first pour on this mallet, on the cross side of the
Ten Commandments coin, what happened, well, what happened was, I thought I was mixing it properly. I used the guide. So TotalBoat sent some cups
that have guides on 'em, and I used the two and four-ounce. So I poured the part one to two, and the part two to four ounce. And then when I, and it really wasn't exactly right. It was kinda close. And so I got a, you can
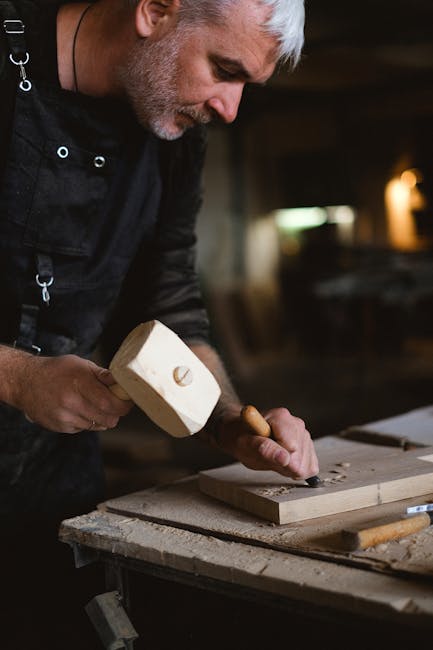
see here on the cross side that it has some bubbles in there, some really, really fine bubbles.
And then of course I had the
air bubble pop out on me, and leave that little dimple in there. But you can see that the, it has some really fine bubbles. If you move back, you really can't see it. But if you come in close, you can really, really
see those tiny bubbles. And then on the Ten Commandments side, when I done my pour, I used the one-to-one ratio guide that I actually didn't see until I was mixing the second pour. Put part one up to the one line, part two up to the two line. And then when I poured it, let it cure properly, it come out much, much better. You can see that there are, it's about as clear as glass, and is probably not perfect,
but it's really close. And I was really happy
with how that come out. I do have an idea for
another project using epoxy that's similar to this,
but quite different. If you wanna see that project, comment below and let me know that.
Now, a couple of other things that I learned about the
epoxy is, for the one, the temperature has to be exactly right. That 70 to 80-degree range,
it needs to be there. I started it in the shop. The shop was around 50, and so I took it inside,
laid it on the table. I poured the first pour on a Thursday. The second pour didn't
happen again until Saturday. And then today is Monday. And so it actually had
48 hours between pours for it to fully cure before I sanded it. Sanding it, when I started
sanding this back down, I thought it was gonna
be much more difficult. I had some suggestions
that you could heat it and use a scraper to scrape. I watched some videos on that, and while a good idea of filling cracks, I was worried that if I did
that on something like this, especially a clear epoxy, that it would actually make some marks or striations in there.
So I decided not to do that
and just go with sandpaper. If you're gonna sand it like this, have proper sanding grits, all the way up to 1,000, or 1,500-grit is what's recommended. Taking those steps up through the grits will take away those fine scratches, and once I was up to that 1,000-grit, or took my steps up through 400, and then jumped to 3000-grit, it polished up just fine. And then of course you need
some polishing compound, which I had no idea I was going to need, or I would have ordered
some or bought some. But I did have that
Blue Magic metal polish. And it polished up nice. I mean, it is really
nice and crystal clear. One last thing that I
did learn about the epoxy is I store it indoors now and not out here in the shop, because when it's 40, 50 degrees out here, it's really, really thick,
especially that part one. So I just store it inside now, in a nice safe place, so that it's nice and warm and toasty when I get ready to use it.
This is the last of
those mallets that I had, that I built on that video. If you go back and watch that video on making those mallets, you can make your own like this. Or, I'm gonna give this to somebody, so, wax on, wax off. It's really sharp. Oh I, I don't know. Sometimes I'm proud of what I make. Sometimes I throw it in the fire. This one, I like it. So this project is not perfect. It's just fitting. Like I said before,
I'm an imperfect being. This is the first time
I've ever used this epoxy. And I'm happy with how it come out for the first attempt, which is why I went with
a small project like this.
Hey, it's all good, man. Those holes are filled in now. This mallet looks more finished than it did before I used the epoxy. I learned a lot. The next time I use it, I'll know better than to try to wing it on my own, and to follow the directions. I'm a guy, what can I say? We don't follow directions very well. Most of the time we don't
even read the directions. Hey, so TotalBoat, I reached out to them while I was making this video actually, and said, "Hey, would you be willing to give a winner of a
contest, some resin?" And so they graciously agreed to do so.
And they're gonna give
you a quart of resin and a court of hardener, and you can go and make
your own epoxy projects, as well as win this mallet. So if you're interested, check the link in the description below on how to enter the giveaway. One winner, this is a U.S.-only giveaway. HazMat regulations prevent them from shipping outside the U.S. And then I don't really know the rules of giveaways outside the U.S., either, so it works out for both of us. Sorry for my international
viewers (claps). I really am sorry. I wish I could give you
guys some stuff too. Maybe someday, hey,
thank you for watching. Click that box right there. It'll take you to the next set of videos.
If you click that box, you get that big old virtual fist bump. You can also click that box right there. It'll take you to the mallet build video, and show you how to make these mallets. I appreciate you watching. If you have not subscribed already, click that Subscribe button. Click the bell icon, so you get notified of all the new content we've got coming. Thank you guys very much for watching..