welcome to part two of my brass padlock project in part one i made the case of the lock and in this part i'll start on the internal moving parts i'll start with the main piece and that's the shackle and that will be made from this piece of brass flat bar i'll cut off what i need and then mill it down to the correct size blank and then from there i can start to shape it if you're not sure what a brass pancake lock is here's a few examples if you do an image search you'll find plenty of them i made this small fixture plate a while back and i haven't had chance to use it yet the first thing i'll do is put dowel pins in so i can take the shackle out and then replace it in the same position if i need to i'm edge finding two adjacent edges here to zero in on this corner and from there i'll take all the dimensions from this point i've printed out the shackle dimensions and next i'll drill these four holes which will start the process of shaping it and i'll take each dimension from the top left corner to drill the holes in the correct positions i'm moving the table and reading the dro and i know how far to go because i zeroed that corner the large hole i'll do the same way as i did on the casing by drilling in increasing size holes and then finishing it with an end mill i'm making this up a little bit as i go along i haven't fully worked it out but i think i'll put it back on the milling machine and i'll mill this slot here between these two holes that's this bit and then i can just use a hacksaw to cut that away there and then also cut away all this section here and then deal with it afterwards i'm not sure whether i'll mill this or whether i'll just file it into shape but either way but before i do that and i cut it away i do need to mill a key way on the back here and that would be better to do now while i've still got the sides to reference off i'll start with the slot between the two holes first and then i'll flip it over and i'll mill the keyway on the back i recently ran a promo for seven of my top woodworking plans at 78% off it was for a limited time and i will be ending it in a few days so i thought i'd let you know if you're interested you'll get access to my recent kumiko bedside table plans plus six more and once you have these plans you can follow along on youtube and build the same projects that are in my videos simply click the link in the description below to get the offer of 78% off and as always thanks for your support it's starting to look a bit more like something now i need to get it to fit into the case i need to open this area here so it fits around the pin better the bottom needs shaping and there's a bit here that needs taking off and if i flip it over i can probably mark the back where the shackle needs to fit into this recess i've decided to file the shackle into shape and i'll use this mini machinist vise to hold it and also to use it as a guide i'm filing some off one point and then switching to another area and taking a bit off there and then gradually working my way to fitting the shackle into the case there's lots of this type of work in this project it's like a puzzle working out what to take off next next i'll take some off the bottom and that will only take a few seconds on the belt grinder for the next section i'll use a file guide and that's an awesome tool for filing accurately it's not finished but it does fit into the case it doesn't sit flat though as it's rocking on the solder joints but before i deal with those i just noticed the dent in the side of the case i dropped it earlier and i didn't realize that it was damaged so i'll try and knock that out now you can see the dented section back in some of the earlier clips i just didn't notice it it marred up the inside a little but it's not too bad and i should be able to sand it out now i'll get back to grinding off some of the excess solder it still needs some cleaning up but that's much better and next i'll mill down this edge i still need to do some shaping on this edge but for now i just need it flat and parallel with this back edge and the reason for that is next i'm going to transfer this slot into the case i'll put a slot in the case for a key to sit into and now i'll be able to put that in position i'll be able to hold it there and indicate off the edge that i just milled and from there i can work out exactly where to put that slot but first before i do any of that i need to remove these pins so i can sit flat on the table of the milling machine this isn't super accurate as i'm holding the shackle in position while i'm indicating it but it will get me in the ballpark the key will give the shackle something to glide on and keep it in the correct position inside the case i've got this small scrap of brass to use for a key and next i'll fit that into the slot i milled the slot in the case and the slot in the shackle with the same end mill so i need to slightly open up the slot in the
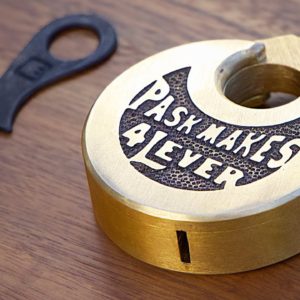
shackle to give it some room to move i should have taken a touch more off the shackle when milling it but it's easy enough to do with the file i'll take the corners off next and it should start looking a bit more interesting i could have milled or filed this but i decided to do it on the belt grinder and most tasks so far i could have done with different methods i'm just choosing a method i feel like doing as i tackle each task that's looking pretty good now i'll start the next piece and that will be the bolt i may not have the right names for all these lock parts as i'm no lock expert but i'm sure if i get them wrong you'll let me know i can use the belt grinder on the outside of this part but i'll do the inside with files and as the brass gets super hot i'll keep it cool with the blast of compressed air this part needs to be pretty accurate so i'll make use of the file guide again when using the file guide i don't use my best files as the carbide faces will destroy them but the fact that the faces are extremely hard the file won't touch them and that's how you can get accurate results and also they're very well engineered and that helps too it might need a bit of refining but that's just about done and this piece fits into the shackle i'll show you how that will work i'll put the shackle there in the closed position and when it's in the closed position this piece will come across so i need to make a cutout into the shackle i'll just draw that so i need to remove that and then when this comes across that will stop the shackle from coming out and that's when the lock will be in the locked position but before i cut that out i'm going to start making the levers that's these four pieces here and they fit on to this pin i need to mill down some eighth inch flat bar down to around two millimeters it may not be obvious to see but i do have a piece of scrap aluminium inside each of the jaws and i'm just milling into those and not into the jaws i've decided to stack and glue the four levers together and shape them all at the same time i'm surprised that didn't happen on the first hole i was expecting it anyway i'll continue through and then i'll go back to the top one after re-gluing it i'm cutting off the waste and then i'll file them into shape i am using a good file here with the file guide but i'm being careful and i'll swap it when i get closer to the carbide faces i'm not confident any of this mechanism is
going to work but the levers do look pretty cool next i'll file notches into the levers for the bolt to locate into i believe the notches are called gates and they'll be positioned differently on each lever i'm not sure if this is the best way but i'll randomly choose a position and mark out one of the levers when the bolt enters the gate to the required depth the bolt should leave enough room behind it for the shackle to be fitted into the case before i fit the other levers i'll remove this section of the shackle that i mentioned earlier you may have noticed that moved on me but like most of the shaping i've done so far i'm working up to the line and checking my progress many times as i go so the lines aren't exact they're just there for something to work towards when the bolt enters the recess in the shackle the padlock is locked and when the bolt enters the gate in the levers it releases the shackle and the padlock is unlocked next i need to make a spring for the lever and i'll do that from this piece of 1mm piano wire to fit the spring i'll drill a 1mm hole i'll do that 6mm deep into the lever i've shaped the end of this steel flat bar to form the springs and to try and keep them consistent three of the levers have the same size and shape spring but one of them is different and i'll explain that later on i can't find my decent side cutters anywhere so i'm using these cheap ones and they need a helping hand as this wire is extremely tough the spring doesn't need much tension it just needs enough to do its job i'll put the bolt in the shackle in and see how it works that works great and off camera i finished the other levers and the one i'm holding is the one that's different to the others i'll put that one in first with just one of the other levers to test the bolt under tension for both unlocking and locking the padlock the spring on the bottom lever pushes up against the underside of the bolt and when all the gates are lined up the bolt gets forced into the gates they'll need some fine tuning but they're not working too bad at all it's not easy lining the gates up like this and that's the reason why i'm only using two levers instead of four next i need to make a key so i can test all four levers but first i need to make a slot in the case for the key to enter i should have mentioned by now and you've probably already figured it out but the key is a push key which will push against the levers and line up the gates i'll be using a piece of 1.6mm mild steel for the key so i'm using a scrap of that to test the width of the slot i made a quick sketch of the key and i'll glue that to a piece of steel and start to shape it the key will do for now but it does need some more work but next i'll shape the end to fit the levers and i've stacked the levers with a pin through them and i'll directly transfer those positions onto the key it's not easy to hold still but it does give me some marks to get started with it's almost there but not quite and it's surprising how accurately the gates and the levers all need to line up i decided the better way to work out where i needed to file was to stack the levers back in the vise with the gates lined up and use that to reference off that was a much better way to go so let's test it out i've got the lock clamp down as i only have one pair of hands and i'll hold the levers down with a piece of tube that's looking very promising the next thing is to add a spring to the shackle so it pops up and opens when the padlock is unlocked i'll make the spring again but this time i'll do it on the lathe i'll use a nail for a mandrel and pinch the end of the wire in one of the jaws i've never made a spring like this before so this should be interesting i'll put some tension on the wire and give the lathe a small blip at the slowest speed and wow how cool was that who knew it was that easy to make springs the spring will force the shackle up but first i need to mill a feature for the spring to fit into i hope the video isn't getting too long-winded i did ask in the last video about multi-part videos and there were quite a few responses and many of them against multi-part videos so i did listen i was going to make this into three parts but i decided to finish it with two to make it easier to hold everything down and for me and you to see what's happening i made a quick see-through face that works fantastic i kept trying it over and over testing it to make sure everything was okay i still need to deal with the springs as they swivel in the hole in the lever at the moment they just angle down to the bottom of the case but they could move into an unwanted position i need to try and fix them and keep them straight i'll attempt to solder them in and i'm putting as much of the spring into the vise to try and keep them cool and stop them overheating and then losing their springy qualities if it has compromised the springiness in any way it's still working pretty well for what's needed and these springs really don't do all that much at all you can see now that they're staying in position and not angling down towards the bottom and because they're staying straight i don't need a front as they're not trying to pop out next i'll fit the front and to do that i need to file down the center pins which were left too long i'll slightly round over the ends of the pins so they locate easier and i'll also remove the excess solder around the other pins so the face can sit properly against the rim next i'll add some more shape to the lock and i'll start by chamfering the edges i could have turned the chamfer but i don't have that good of a hold in the chuck as i didn't want to crush the case you can hear that's catching the corner of the open section as it comes around so instead of using the lathe i'll mark it out and do it with files i also want to chamfer the smaller through hole which would have been trickier on the lathe it could have been done but i like filing anyway i've decided to round over the inside edge of the chamfer just on the through hole i reckon that looks better and i also took the edges off the shackle and i may even round over the sides of the case too but next i'll add some artwork to the face i'll do that with etching and the first thing i need is my design on vinyl to use as a resist the design is inspired by old brass pancake locks which is what i'm trying to replicate the vinyl will resist the etch leaving the exposed design open and i'll use tape to cover up the rest of the brass and for the etching solution i'm using ferric chloride i'll hang the brass upside down so the particles from the etching fall away and keep the face exposed to the ferric chloride i left it a few hours and i can tell it hasn't done a very good job but i'll neutralize it with baking soda and take a look i've already etched quite a few times with this bottle of ferric chloride and it's become less potent and apparently there are ways to put some bite back into it but i've never tried anyway it's hardly done a thing so i sanded it off and prepared it for another go i couldn't get any ferric chloride locally but i did find some ammonium persulfate so i'll give that a go instead it mixes one part etch to five parts water and it has to be heated to around 70 degrees instead of hanging it this time i've taped small standoffs which were made from offcuts of acrylic and don't worry i won't be using those tongs in the kitchen again but don't tell mrs p that i stole them that worked heaps better it started etching straight away but i left it in there for a few hours and i kept checking it about every 10 minutes or so and next time i need to etch brass this is what i'll be using just like on the vintage pancake locks i'll stipple the background of the artwork i've ground the end of this cheap nail punch and that should do the job hopefully this works out and i don't stuff it up it actually didn't take that long to do maybe about 20 minutes or so and it doesn't look too bad at all i'll start cleaning everything up ready to assemble the key can't go anywhere when it's together but it won't hurt to glue it in on the original locks there would have been a raised section on the base just here i haven't got that and the reason for it is for the front edge of the lever to ride on and that would have lifted the lever slightly off the surface and lessen the chance of dirt or anything getting underneath it and stopping the lock working i could carve a section out with the dremel and i've thought about doing that but instead i'm going to put a very thin washer and it is very thin i'm going to put that down first and that will stop the first lever from sitting completely flat on the bottom it's still pretty flat but not completely and i think that will do the job when i say lessen the chance of dirt getting underneath i meant to say more the chance of the dirt underneath causing problems i'm assembling it for the last time and i'm also putting washers on the top of the levers and the bolt i'll do some final tests because when this goes together it's never coming apart again this is the last time i'll see the inside it's a bit of a shame it gets covered up but i have taken lots of photos to secure the face the pins will get peened over to lock it on and to make it super secure i'll taper the holes in the front of the face and i'll do that with this tapered countersink bit i'm just doing it by hand as i don't want it to grab and pull all the way through and it only needs a small amount of material removed for it to work that's it never seeing the inside again unless there's ever any problems and i'll have to get in there somehow before i sand off the end of the pins i'll blacken the stipple and when it's dry i'll sand the face then while that's drying i'll stamp my logo into the key and i'll do that with my fly press the key being mild steel will rust so i'll try and prevent that by blackening it with super blue after it's been blackened it needs oiling and i've been told that water soluble cutting fluid does a great job so i'm trying that just some hand sanding to go and i won't be going too far as i reckon the lock will look at its best when it's built up a patina i think that was one of my favorite projects ever it's functional and there was a lot of working out and it also looks good and i think it even feels better than what it looks but you'll have to take my word for that hopefully you enjoyed the video if you did please like and subscribe thanks for watching and i'll see you on the next one