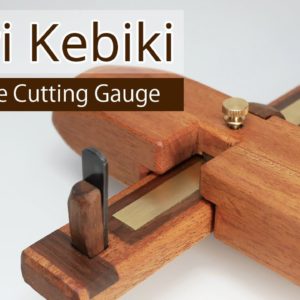
Hi everyone. I made a Wari Kebiki, a Japanese cutting gauge. There was one guy on YouTube who made a real nice one and I thought my skill wasn't ready for it yet but this channel is an entertainment where I show the best I can do for you so I tried it. Let's see how I made it. To start with, I was wondering where I can source the thick wood for the main body and I simply found ones on amazon US. This was 2" by 2" by 8" Mahogany and a set of 4 for only 12 dollars. I have no complaint about the quality. I also bought a blade from Amazon Japan. It's only 9 millimeter width but that's the only thing I found online. Now as usual I planed them but look at this mallet.
I just made this from $1 scrap wood from Rockler. Anyways mahogany is evil when it comes to reading the grain direction so I checked what direction will work the best and marked
it ahead of the time but I still messed up some. Then, I worked on the arm where I'll put the blade in First, I decided to do a walnut inlay to reinforce the area where I fit the blade with a wedge and while I waited for the glue to dry I worked on the other inlay that goes for the long side of the arm and as I had a time I decided to do a brass inlay in the walnut, too. Here, I'm preparing the walnut inlay I cut in the outline by a knife and used a router plane to make the mortise but I kind of messed up. The grain caught the knife blade and it ended up creating a little gap For the grain direction, I could have marked out line only on the surface but not cut in and use chisels to clean the edges. See. Anyways I cleaned the mortise for the brass inlay and used five mins epoxy to fit it.
Then I moved on to the main body. I learned it's good to drill the holes close to the edges but at this time, actually some of the drill holes hit the side walls inside. if you don't have a drill press machine like me, it's safe to go a little inside. Then I shaped the body outline by chisels and the hand plane. For the fence, I roughly made sew lines and cleaned the unnecessary parts by chisels. The most difficult part of the process was to make the fence square. The flat side was okay as I could use a router plane but the rounding surface took forever to satisfy me. Am I happy with it? Nope… Anyways, I fabricated the rest of the body by a flush trim saw and used chisels to make the final shape. It was fun process but now I want a carving knife.
Okay, let me do some finishing touches. I left the brass sheet a little above the surface and I thought it's easy to sand it too flat. However, as the brass is much harder than the wood, the shape becomes like this when I sanded it. so I decided to plane the back side to adjust the thickness of the arm instead. Then I made the wedge for the blade the white thing over the brass is just a crazy glue. I found when there is a gap between contrast wood, this thing works great. Now I got see if it works The first path always has to be gentle and then go several paths from both top and bottom. It seems like I still need to score but I tapped it by hammer like how Japanese do and fixed the clamps to score it again.
But it actually came off. The hammer worked. Here's the cutting edges. The cut wasn't that clean but it's pretty much because I didn't tighten the wedge enough at the beginning. and in the middle of the cutting process, I had to hit the wedge by hammer to secure it and it might have moved the blade a little bit. Please be sure to secure the blade so your blade won't move.
That's it for today. Overall, it's functional but I think the shape is a little too bulky. and there could be many minor things I can improve but I enjoy the project so it's okay. Thank you so much for watching. I would be happy if you liked the video and happier if you subscribe to this channel if you have any suggestion to my video, it's also welcome. See you..

