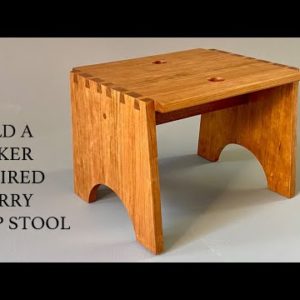
hey everyone and welcome back to the shop this is
a kitchen step stool and if you want to build this project i'll have a link to the plans down in the
description below it's made out of solid cherry it has a 5 degree angle on the sides giving it kind
of a modern or japanese look through dovetails and a solid brace in the center making the stool very
strong this stool is meant to get used so it can be kind of a rustic build which would be a perfect
opportunity to practice those dovetails i'm using an old cabinet top for this project and it's solid
cherry except for the plywood bump out on the one side i'm using a straight line rip jig and the
circular saw to cut off this piece of plywood now i've got a good straight
edge on this side and i'm going to adjust the fence to 11 and three
quarters to cut off that screw hole and then i'll readjust the fence to
11 inches to cut off these biscuits now i can run the board through
the planer to remove the old finish okay well now this board is looking really
nice some really nice figure in this board and the funny thing is this used to be the
top so probably when i was building this i made a mistake because you can obviously
see the seam between the two boards on this side but on this side it's really
difficult so i must have done something to to not do the right thing but regardless
i'm reusing the board now and this time i'm going to make this side the top i want the
grain to have the waterfall effect so it'll go up one side across the top and then down and
the next step is to break out the crosscut sled and this will be one side this will be the
top and then this will be the other side i'll cut the two sides first and
i'll cut them just a little bit heavy then i'll set up a stop block and cut
them both to their finished length of 10 and a quarter then i'll
cross cut the top at 13 and a half i want to take a minute and talk
about this project's sponsor bloxygen i use blue oxygen because it works i
use it in all my oil-based paints and finishes polyurethanes and even oil-based fills the
heavy argon gas and bloxygen will blanket you blankets the finish and force any oxygen in
the can out that will keep your finish from skinning over thickening and going bad so the way
to use it is when you're ready to put your paint can away or your finish just open up the lid a
little bit put the straw inside the can and hold the button down for two full seconds that's one
thousand one one thousand two then close the lid now the heavy gas is sitting on that finish and
keeping your finish from skinning over thickening and going back so it really works and that's why i
use it if you want to learn more about the oxygen click on the link in the description below i'm
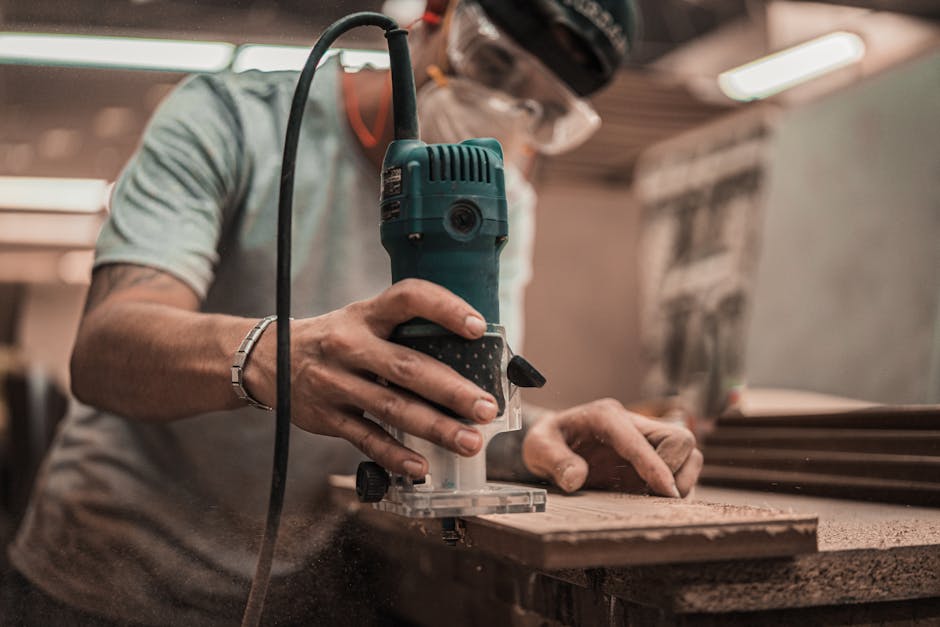
using the table saw to cut the dovetails and i'll be using this jig i just posted a video last week
on how to make this jig if you didn't see it i'll have a link in the description below definitely
makes cutting dovetails a little bit easier what i need to do is get the seven degree angle
that is on this jig on to my sliding t-bevel here so i can mark out where the dovetails will be at
the top of the stool and to do that i'm just using a block of wood to prop the t-bevel away from the
fence and aligning the metal edge of the t-bevel with the kerf that's in my cross-cut sled and
now i can bring the t-belt over to the top of the stool and mark out for the dovetails with the good
side of the board facing out i'll use the t-bevel and i'm basically just using half of the piece of
metal here for my first pin then i'll flip it over and trace it again this time i'm using both pieces then i'll come back and again only use
the half and i just repeat that until i get close to the middle and i'll have a
smaller pin in the middle that's fine by me i don't mind if the pins
are not all exactly the same i think it makes things look a little bit
more interesting when the pins are different once i get close to the center
i'll come to the other side and repeat the process half
pin both pieces of metal half both again and now you can see i'm
going to have a smaller pin in the very center right here so i've got three
that are the same size on this side and three that are the same size on this side now what i
need to do is mark here and remove this waste i'm using one of the cut off pieces to scribe
a line the same thickness as the material and also that will prevent any
tear out when i'm cutting the joint now i'll set the blade height to
the same thickness as the wood and make the first cut at the line
using the right side of the jig after making that first cut at each line
i'll go back and remove half of the material now i can readjust the jig
make the first cut at the line and then cut away the rest of the material here are the three parts that will make
up the stool i've labeled them one two and three and put an underline under the number
to make sure that they're in the right position and i don't accidentally flip them like
this i've already cut out the space for the pins on this one which creates the tails
and when i do that on the number three spot i want to make sure that the number three is
facing out so i'm going to take it like this flip it i'll bring the number two which is the
top of the step stool make sure that i'm flush in the front and then use a sharp pencil
and trace the pins i'm flush at the sides and in the front and i'm using a
clamp to help hold the parts in place now i'm going to use the bandsaw to make this
cut and i'm going to take most of the pencil line and i'll stop at this scribe mark now i've replaced the jig with
just a straight piece of plywood and again i'm going to use the table saw
to plow most of the material in between the cuts made by the bandsaw then i'll
go back to the bandsaw and finish it off i've set up a fence on the bandsaw
and now i'll finish the cuts okay well now i can go ahead and see how this fits hmm there we go and that's that's pretty good
maybe a little sanding no looks pretty good i did screw up though i hit the top of the tail
with a bandsaw here and the side of the tail with the bandsaw here it's always harder to make these
cuts when you're doing it on camera but again this is just a good practice piece it's a kitchen stool
so it's going to get beat up before i put this together i do want to do a few more things i want
to cut a half moon shape at the bottom a little slot at the top for a handle and i am considering
tapering the the leg from the top down to zero like so maybe like a five degree angle that
means i'm going to have to cut into this tail and i'm not sure i want to do that but it might
be worth it i think it's instead of looking like just such a simple little box it might give
it some style i decided to go with the five degree angle and that's what it turned out to be a
five degree angle so i'm going to cut that before i cut this half moon shape so i have some more
support against the fence and this saw does have a laser which i very rarely use but in this case
it happens to be very helpful because i've turned the laser on set the fence at five degrees and i
can see exactly where the blade is going to cut and it's right there at zero at the bottom
and it kind of splits this tail right in half well now i have two choices i can cut
that same five degree angle along the top and i'll just trace these lines and then connect
them and cut make that cut with the table saw or the band saw is still set up with the fence i
can cut this off first and see how that looks and maybe just cut a small five degree angle on
the front edge here or maybe just a round over i figured that i would just cut that tail off
first and add the round over because that way i can see how it looked i can always make it smaller
but i'm not going to be able to add that tail so i think this looks pretty good i'm going to leave
it just the way it is as far as that's concerned and now i am going to cut the half moon shape
in the bottom and i'm going to add some bracing at the very top here for some added strength
i have this pattern from another stool that i made a few years ago and i'll trace this
and when i cut it out i'll leave the line and then use the pattern to clean the
cut up with a flush cut fit in the router okay well i think this is looking pretty good it's
kind of a japanese meats shaker inspired type of a design i decide not to add a slot or a finger
hole in the center i do want to add a little bit more strength though so i've got a piece of
sapili here and i'll add that to the bottom simply by screwing through this board into the
the top of the stool and into the two sides after cutting the brace to
length i'll pre-drill and countersink two holes about
three inches from each side next i'll pre-drill and countersink a hole on each
side of the stool to attach the sides to the brace i've sanded the inside of all the parts
and now i'm getting ready for the glue up and the first part i'm going to
attach is this brace in the center i've got the brace clamped in
place making sure that i'm flush on both ends and i'll attach it with two screws after gluing the parts together
i used a few clamps to close up any gaps and let the glue set up overnight
the following day i filled the screw holes with wooden plugs and drilled finger holes
two and a quarter inches in from each side okay well i'm real happy with the way this project
turned out i think it's a pretty classy little step stool that would look good in any home
and not a big time or material investment so a great project for practicing these dovetails and
you could definitely change this design you can bring it up to 17 inches make it a little wider
and that would be a really nice looking bench and something that i might do and just like every
project this project didn't go completely smooth and i don't go into them when i'm shooting the
video because it just takes too much time but on my second channel i'm going to talk about some
of the problems i had some of the mistakes i made and it's just some of the things that i had to
deal with using the the old board using the old cabinet top to make this project so if you are
going to build it you probably want to check out that video it'll give you a little bit more
insight before you start cutting the wood for your project so as always thanks for tuning in
and if you want to check out that video click on the link in the description below and that'll
bring you to my second channel have a great day