Marc:Today I'm going to make this fancy little picture frame for Nicole. (fast paced music) I'm using figured maple veneer, wenge, and solid maple as my veneer substrate. And I'm also using this amazing, exotic, afzelia wood that I got from David Marks. I hope I'm pronouncing that right. I start by milling the
maple using the jointer to flatten one face and one edge. And then I use the planer
to make the other face parallel to the first. The final thickness of the maple was about 7/8 of an inch and that's one of the great things about milling your own wood from rough stock. You usually end up with thicker material in the end. Now, using the drum sander, I clean up this great afzelia home sawn veneer. This is perhaps one of the most beautiful woods I've ever laid my eyes on. And that's exactly why it's going in Nicole's frame. By the time both sides
are smooth, I'm at about 1/4 inch in thickness. And while I'm here, I'm
bring the wenge down to an 1/8 of an inch.
And now it's time to prepare the veneer. With a straight edge and a razor blade, I clean up one edge. It usually takes several passes to get all the way through. I then use one of my maple frame pieces as a guide for cutting
each piece of veneer to the appropriate width. My piece of maple is actually double wide and that saves me some time and effort. After the veneering is done, I'll split each piece of maple down
the middle, ending up with a total of four frame pieces. So I only need to cut
four strips of veneer. (funky music) So here I'm using a couple of scrap two by fours as a veneer press. And to improve the
distribution of clamping pressure, it's always a good idea to line the inside of the press with something relatively soft like cork, newspaper or, in my case, adhesive backed felt. That's really all I had
on hand at the time. And, surprisingly, this worked very well. So here's how the sandwich
is going to go together.
The sold maple in the middle with a maple veneer on each face. Followed by a [call] on both sides. Now, normally, I would never use a water-based wood glue for veneering. Some people like it, but I don't. Introducing water into the equation can sometimes spell trouble. So I usually stick to
the urea resin glues. But since this frame is
so small, I really don't have any majors concerns about movement and moisture so standard PVA glue it is.
A liberal coat on both the veneer and the maple substrate will do the trick. I like to secure the
veneer with blue tape, just to stop it from
slipping in the clamps. Now, clamp the heck out of it. I put as many clamps as I can fit on there and try to alternate them up and down. That'll promote even
distribution of pressure. And the next day I take the sandwich apart and admire that beautiful maple veneer.
And next I clean up one of the edges with a block plane. And with the clean edge
up against the fence, I clean up the other
side perfectly parallel to the first. Then at the band saw,
I slice each veneered piece of maple in half to
get my four frame pieces. I used the band saw
because I want to maintain as much width as possible. And a thin curve for the band saw blade is perfect for this. And now it's time to glue on the trim.
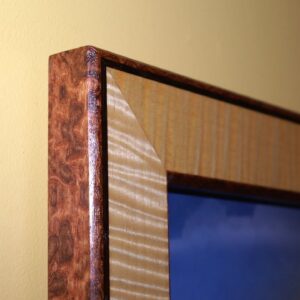
The order of the trim will be a 1/4 inch afzelia, followed by 1/8 inch wenge, followed by the veneered maple, and then another piece of 1/4 inch afzelia. And to save time, I'm going to glue up two frame pieces at the same time. Just be sure to mark
which faces receive glue and which ones don't. You don't want to accidentally glue your two frame pieces together. So here's a quick tip for you. Our trim is about 1/8 of an inch oversized in width. So, to center the veneered frame pieces, I prop them up about a 1/16 of an inch using blue tape and a
thin strip of veneer. And now I can start
assembling the sandwich. Notice that I'm using a couple of random pieces of scrap to distribute the pressure on the outer edges as well. And you do need to be
careful here because, with all that glue,
those pieces really like to slip and slide around.

Have I mentioned that I like clamps? After a few hours I
take the assemblies out of the clamps and start
cleaning everything up with a block plane. Just don't go to far here. A tear out, at this point,
would be disastrous. With a dado blade
installed in a table saw, I create a rabbit on the
inside of the frame pieces. That's going to hold the clear glass or plastic, the artwork,
and the backing material. Also notice that I'm using a sacrificial fence here. This allows me to bury
part of the dado blade into the fence and my
rabbit can go right up to the edge of the work piece.
Using my router and a
chamfering bit, I put a small chamfer on both
the inside and outside edges of the frame pieces. And at the miter saw,
I cut each frame piece to length while also
creating the 45 degree miter. For extra reinforcement, I'm going to add a domino loose tenon here. Alternatives would be biscuits, dowels, or a simple spline. Gluing up the frame is
pretty straightforward when you have reinforced miters.
Just add glue, add your
dowels, your splines, or in my case, dominoes,
and hammer it home. Now, even with
reinforcement, you can still clamp the frame out of square. So it's important to check. My frame happens to be
slightly out of square. So to fix it, I use another
clamp on the diagonal to force the frame in the
direction I want it to go. This is the same thing that we would do for an out of square piece of case work. Work's like a charm. Once the frame is dry,
I sand the entire thing to 180 grit. And now, the moment I've been waiting for. Time to apply the finish. I selected some pretty flashy wood here and I'm really excited
about how the finish is going to bring out the vibrant color and figure.
And nothing does that quite like an oil-based wiping varnish. Oh yeah. That's the stuff. I like to brush on a pretty liberal coat, let it soak in, and then
wipe off the excess. Now this frame was meant
to house a very special Christmas gift for Nicole. I had some custom artwork made up for her and decided that a custom frame would be the only way to go. So I drop in the
Plexiglas first and remove the protective film. Then I add the art, followed by 1/4 inch plywood as a backer. And the whole thing is secured using some plastic clips that I picked up at Rockler. Now, for those of you
who don't already know, Nicole and I are big fans of the World of Warcraft game, and those are our toons enjoying a beautiful sunset in Azeroth.
And, yes, I'm a gnome. (guitar music).