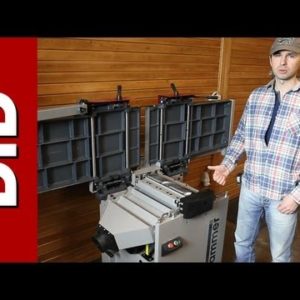
Cam recorder is on so here we go! I would like to welcome you in the next episode of Domidrewno, Which you haven't seen yet. Cam recorder hasn't been here so far And on the first plan of course we see This planer thicknesser and I am just behind it And I would like to dedicate today's episode to describe this really cool machine This machine is made by Felder, Hammer series so the smallest and the model is A341 And here is funny story for a start: Few months ago I posted an entry on my blog With the picture of of old power tool old hand held router and the picture of it was taken on the table of this planer thicknesser although 31 model so slightly narrower and to be honest with you you couldn't see much of the planner on this picture But even though few of you noticed it
and gave me exact name of that model So congratulations! And respect for good eye! Probably because of those very characteristic red covers Next time quiz will be more difficult I promise! So where do we start? Maybe here – as you can see it's Hammer series – smallest machines series Domidrewno workshop is not a huge space so my main priority was to have machines not too big I think this one should fit perfectly.
You probably noticed it stands very close to the wall, So I can tell you right now the distance between machine and wall is 30cm, pretty close. As I mentioned before this is model 41 where cutter head is 410mm wide. This is main feature So we start from this. Let's move on to planning mode since it's all ready Overall length of both tables is 1.8m Where one table is 88cm long Pretty good I think! And here is already first thing I noticed In that French machine I was fixing, or Lurem, or even newer models You can notice you have special ends of the table Here you don't have them.
I mean those endings of the tables Nowadays they make tables ending with some kind of feather like shape And here you have solid cast iron and no special shape ends. I think main reason for this is, using spiral shaped cutter head, air velocity is not that drastic and big like in classic straight cutter heads So the manufacturer could modify it. As I mentioned second before tables are made from cast iron So work is very stable (it won't chase you around the workshop) they are very heavy, perfectly planned So we don't have to worry those tables won't play like alloy or steel constructions tables are 410mm wide – full width working space We also have guide rail here Guide rail loosening is here at the end and second tightening screw is at the back. And then we can easily move it back and forth Of course guide rail itself has tightening mechanism at the back.
And those details you can't see I will show you on pictures so you can see it better. Loosen screws and move Break here and we can work easily on angles between 45-90 degrees with this guide rail The construction of this guide rail is different from the one I had before I mean model 31 In this machine it's made more stable, solid. There is also possibility of your own regulation by two grub screws.
Acting like bumper stops. So such angles as 45 and 90 degrees can be perfectly adjusted to the table It's very nice of them they thought about it Move and fix in position. What else we have here for the planner? Of course! Cover! We can fix it and then material goes safely either underneath or on the side We are safe and there is nothing which can accidentally happen here regarding strange situation with your fingers being close to the cutter head. Really safe solution. Loosen it and we can swap it to the other side. Regarding in-feed table adjustment: we have scale up/down and it can be adjusted between 0-4mm material removal OK let's move on just give me a second I need to fit scale. Oh well, at the back, there is our Christmas tree still, which was left here after Christmas Eve we made here in the workshop! Ha ha Ha OK loosening tables two eccentric screws Loosen them up and we can lift whole thing Another difference between this and previous model I had Is this: you lift both tables together In the previous one I had to lift each table separately After lifting them up we can see "the heart" of this planner thicknesser, main part – cutter head In this case it's a new head from Felder Spiral cutter head called Silent Power And now a little bit more about it as it's really cool thing and it's definitely worth mentioning.
It's pretty impressive, as this cutter head looks completely different than cutter heads I am used to. big groove in front of those little knives There are two spirals going around I will try to do close-up on those little knives. As you can see each knife has 4 cutting edges everything is mounted with screws on the cutter head So change is fast and simple indeed. OK I'll put camcorder away as it's difficult to focus on filming and talking in the same time I'd like to point out few important things For Silent Power construction. In my case it was really important to reduce the noise. The difference between spiral and classic cutter head is 60% in noise reduction And this is really awesome figure My workshop is almost entirely built from timber and any noise creates echo effect Which you can notice even now in the background, so this noise reduction saves my life.
Another thing is this big groove though knives are small So collecting wood chips during work is ideal and wood chips themselves are much smaller. I saw it somewhere on the internet in some advert clip Where guys were comparing traditional and Silent Power cutter head Theoretically amount of it is the same as you remove the same thickness But because the are much smaller – they take much less space in dust collector Next important thing is energy saving It's quite easy to explain because cutting edge of each of these little knives is much smaller than typical knife 410mm long so machine is under smaller load while processing material.
Next very important feature for me: is – it doesn't matter if we have 2 or 6 knives planner/thicknesser – when we run logs for instance, it may happen you have some grit or metal particles in it which we didn't notice, then we end up having a chip out on EVERY single knife So on every next pass we have this annoying mark where the chip out is.
Here all you need to do is find the chip out rotate one or if you need two little knives to next cutting edge and job done! No hassle! So I don't have to change all the knives Just rotate one. I can't tell anything about durability of the knives yet As it hasn't been running long enough But that will come and I will tell you later. OK time to move on to next part Now we have tables lifted up and we want to use thicknessing mode It just couldn't be easier All we have to do now is move this dust collector adaptor Now we have thicknesser's table freed up and off we go! By the way thicknesser's table is also done in cast iron, It has central lifting column here is locking device and here is lifting wheel material thickness working range is also quite amazing for the machine like this it can operate between 4-225mm so not bad result here is handle which engages infeed roller on or off the feeding rate is 6 metres per minute It doesn't have speed control,
Just one constant That's pretty much all about thicknesser's mode I was talking about cutter head cover and there is micro switch located here which, in case of changing set-up doesn't allow machine to start.
This micro switch turns machine off until you put top tables back on their place Now electrical parts, machine is equipped with 4kW motor which is more than enough while using Silent Power cutter head. On this side you have 3 phase socket and on/off switch there are no central switches or electric locks here So that's all in electrics Closing the table. You can see here another lock, Which stops table from accidental dropping down. You need to manually unlock it and then you can drop the tables down.
Drops down, tighten 2 eccentric screws and that's it! All you have to do is connect dust collector's hose and you are good to go! I'll show few more places you can do some adjustments I'll lift the table I just need this smaller camcorder… That's how it looks from the other side Now what I like to show you are those plastic caps there are 4 plastic caps on each side of the cutter head underneath those caps are some screws which adjust infeed and outfeed rollers those rollers which move your material while thicknessing mode So this is the place you can reach just in case as well Next place, I'll move a little bit here, are those bolts which hold motor.
And another one on top here, so we loosen those 4 big nuts and using that 5th screw we can tighten the motor or loosen if you need and last place which I might revisit in the future is this metal plate and after undoing those nuts you can get to driving belt. Although I hope I won't have to undo it at all. and here you can immediately see dust collection adaptor it's 120mm diameter OK and now few words about accessories you can buy additionally First and most important thing in my opinion is horizontal borer attachment which adds another function to this machine, and it is like horizontal drilling machine – I don't have it by the way. Next thing is and I am thinking how to show it to you… are really thick alloy made extensions this is 400mm and you can also get 800mm long You can fit these extensions either on outfeed side of the thicknesser's table or that side on planner's infeed table so if you are running something really long you don't have to struggle – better add this extension and almost double your table Pretty cool stuff I wasn't sure about positioning this machine in the workshop And I still don't know if this stays here for good So it's really nice to have an mobile option How it looks: There are plastic wheels which you bolt into that side where the holes are feed long axle rod fix on that side on the bottom and we also have kinda hood there are 3 mounting holes for this hood the last thing is long handle which we fit under this metal hood Lift this end of the machine and we can move it around Really smart! I haven't fitted it in mine yet but it is possible
I will have to move it somewhere else and it's easy enough to do it on your own.
If you have forklift you can you see it If you have any questions about this machine don't hesitate and I'll do my best to answer I will also make few pictures as usual so you will be able to see some details which might be interesting to you I bet you now you want me to fire this beast up to see what it is capable of But we will leave it for the next episode
Which I hope you will enjoy as well See you soon!.